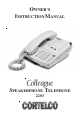
OWNER’S INSTRUCTION MANUAL SPEAKERPHONE TELEPHONE 2203
THANK YOU FOR PURCHASING THE COLLEAGUE SPEAKERPHONE TELEPHONE We want you to know all about your new Colleague Telephone, how to install it, the features it provides, and the services you can expect from its use. We have included this information in your Owner’s Instruction Manual. PLEASE READ BEFORE INSTALLING AND USING YOUR NEW TELEPHONE EQUIPMENT.
TABLE OF CONTENTS IMPORTANT SAFETY INSTRUCTIONS ............................................................. 2 TELEPHONE USAGE ............................................................................................ 4 SETUP/INSTALLATION ................................................................................ 4 WALL MOUNT INSTRUCTIONS ................................................................... 5 TELEPHONE PART IDENTIFICATION ...............................................................
IMPORTANT SAFETY INSTRUCTIONS Always follow basic safety precautions when using your telephone equipment to reduce the risk of fire, electrical shock, and injury. 1. Read and understand all instructions in the Owner’s Instruction Manual. 2. Read all warnings and follow all instructions marked on the product. 3. Unplug this product from the wall outlet before cleaning. Use a damp cloth for cleaning. Do not use liquid or aerosol cleaners. 4. Do not use the telephone near water.
10. Do not disassemble this product. Opening or removing covers may expose you to dangerous voltages or other risks. Incorrect reassembly can cause electrical shock when the product is subsequently used. 11. Do not overload outlets and extension cords. Some telephones require AC power from an outlet. Overloading the outlets can result in the risk of fire or electric shock. 12. Avoid using a telephone during a local thunderstorm. There may be a remote risk of electrical shock from lightning. 13.
TELEPHONE USAGE SET UP/INSTALLATION 1. Connect the telephone line cord. a. To connect without an answering machine. • Use the new line cord to connect the PHONE jack of your new phone to the modular wall jack. b. To connect with an existing answering machine. • • • Use the existing line cord supplied to connect the LINE jack of your answering machine to the wall modular line jack.
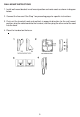
WALL MOUNT INSTRUCTIONS 1. Install wall mount bracket in wall mount position and route cords as shown in diagram below. 2. Connect the line cord. See Step 1 on preceding page for specific instructions. 3. Push out the handset hook and reattach in opposite direction for the wall mount position, plug the coiled cord into the handset, and then plug the other end of the cord into the case. 4. Place the handset on the base.
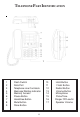
TELEPHONE PART IDENTIFICATION 1 2 3 4 5 6 7 8 9 Flash Switch Data Port Telephone Line Cord Jack Message Waiting Indicator Memory Access Pause Button Handsfree Button Mute Button Store Button 6 10 11 12 13 14 15 16 17 Hold Button Flash Button Redial Button Volume Button Microphone Pulse/Tone Ringer Off/Low/Hi Speaker Volume
TELEPHONE FEATURES PULSE AND TONE DIALING 1. If your telephone line accepts a touch-tone dialing, set the PULSE/TONE switch to the Tone position. 2. If your telephone line requires a rotary (pulse) dialing, set the PULSE/ TONE switch to the Pulse position. 3. If you are unsure which system you have, set the switch to the TONE position. Lift the handset. When you get a dial tone, dial a telephone number. If the dial tone continues, move the switch to PULSE, and then dial the telephone number again. 4.
HOLD BUTTON 1. To place a call on hold, press the HOLD button and hang up the handset. The HOLD Indicator will light up and remain lighted until you resume your conversation. 2. To resume your conversation, lift the handset or that of any extension phone on the same line. The HOLD indicator will go off and your call can continue. FLASH BUTTON This telephone provides a line break signal for accessing PABX service or for convenient use of Call Waiting from your local telephone company.
To Dial A Phone Number In Memory 1. Lift the handset and wait for a dial tone. 2. To dial an auto memory button (located on top of base) - Press the desired auto memory button. 3. The number will be dialed automatically. PAUSE BUTTON The PAUSE button allows you to insert a 3.6-second pause in the dialing sequence. This is particularly useful if you are connected to a PABX system where you must dial an access code (usually the number 9) to obtain an outside line.
DIP SWITCH The DIP Switch located under the plastic memory index cover provides for: a) Positive line disconnect option selection insures that any hookswitch depression disconnects the call. b) A-Lead option selection used for special applications such as use with 1A2 Key Systems. c) Handset or Headset option.
TELEPHONE SERVICE PROBLEMS If you have any problems with your telephone equipment service, determine if the problem is with your unit or the telephone company lines. BEFORE CALLING THE TELEPHONE COMPANY, be aware that they may charge you for a service call if the problem is caused by your telephone equipment. TROUBLESHOOTING PHONE DOES NOT RING 1. OFF/LOW/HI ringer switch is set to OFF position 2. Line cord is disconnected at telephone outlet or at telephone end. 3. Phone is OFF HOOK.
MAINTENANCE INFORMATION Treat your telephone equipment with care for trouble-free performance. Avoid dropping the handset. Carefully place the handset on-hook after use. Avoid putting near heating appliances and devices that generate electrical noise (for example, motors and florescent lamps). Clean your telephone equipment with a damp cloth. Stains may be removed with a mild soap. Do not use liquid or aerosol detergents or cleaning agents.
TELEPHONE REPAIR DO NOT ATTEMPT TO REPAIR THIS PRODUCT YOURSELF. Telephones manufactured by CORTELCO must be returned to us for repair. You can return your telephone to CORTELCO for repair or replacement in accordance with our LIMITED WARRANTY. CORTELCO warrants THIS PRODUCT against defects in material and workmanship in accordance with our LIMITED WARRANTY. If your telephone is returned for repair, include a copy of your sales receipt containing the date-of-purchase.
FCC INFORMATION Part 68 is a Federal regulation which requires equipment to be tested and registered with the FCC prior to its connection to the network. This equipment complies with Part 68 of FCC rules. On the bottom of the telephone is a label that contains, among other information, the FCC Registration Number and the Ringer Equivalence Number (REN) for this equipment. You must, upon request, provide this information to your telephone company.
INDEX A, B, C Adjusting volume A-Lead 7 10 D Data Port Dialing Mode DIP Switch 8 7 10 E, F FCC Information Features Flash Flash Switch G, H, I, J Handsfree Button Headset Compatible Hold K, L, M Maintenance Making calls Memory Message light Mute Button 14 7 8 8 9 9 8 12 7 8 9 9 N, O, P Part Identification Pause Button Pause Time Positive Line Disconnect Pulse dialing 6 9 9 10 9 Q, R Receiving calls Redial Repair 7 7 13 S Safety Setup Speaker Volume Store Button 2 4 9 8 T Tone dialing Troublesh
LIMITED WARRANTY If you purchased this product new in the U.S. or Puerto Rico, CORTELCO warrants it against defects in material and workmanship for a period of five (5) years from the date of original purchase. This warranty is in lieu of all other express warranties. During the warranty period, CORTELCO agrees to repair or, at its option, replace the defective product, or any part of it without charge for parts or labor. This is your exclusive remedy.
TELEPHONE NUMBERS ____________________________________________________ ____________________________________________________ ____________________________________________________ ____________________________________________________ ____________________________________________________ ____________________________________________________ ____________________________________________________ ____________________________________________________ ____________________________________________________ _________________