
Instruction manual


14
Station 13 Station 14
Station 15 Station 16
4.4 Power
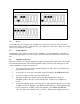
Connect the AC power adapter to the 12 VDC jack on the back of the 2743. This is shown as
Item 9 in the picture on Page 7. Plug the AC power adapter into a wall outlet. Please be sure this
outlet is not controlled by a switch.
4.5 Status Indicator
Verify that the status indicator (Item 8 Page 7) is blinking. For Door Intercom Adapter, the
indicator should blink slowly. This shows that power has been connected to the unit.
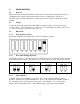
4.6 Door Intercom Connection
The 2743 connects to a Door Intercom through the external wiring block and 8 wire modular
cord included with the unit. The Door Intercom is then connected to the wiring block. The steps
for Door Intercom connection are as follows:
1.
Locate the 8 wire cord and the external wiring block. The 8 wire cord is black and is
approximately 6 inches long.
2.
Connect the cord to the jack on the back of the 2743 labeled “TO WIRING BLOCK.”
3.
Connect the other end of the cord to the wiring block.
4.
Install the Door Intercom and doorbell by following the manufacturer’s directions.
The 2743 is compatible with NuTone brand Door Intercoms although other brands
may also function correctly.
5.
Connect the speaker wires of the Door Intercom to the wiring block. Connect the +
speaker lead to the BROWN wire and connect the – speaker lead to the WHITE wire.
6.
Connect the doorbell wires to the wiring block. Connect one doorbell wire to the
BLUE wire and connect other doorbell wire to the GREY wire.