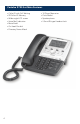
Instruction Manual CORTELCO 2700 Single-Line / Multi-Feature Set
Table of Contents Why VoiceManagerSM with Cortelco Phones?......................................................... 2 Cortelco 2700 Set Features....................................................................................... 3 Telephone Set Part Identification.............................................................................. 4 Installation and Quick Setup Tips............................................................................. 5 Telephone Set Buttons..............................
Cortelco 2700 / Single-Line / Multi-Feature Set Why VoiceManagerSM with Cortelco Phones? • Total cost of ownership savings with Cox • Total flexibility to your business needs • One vendor to call to support voice and equipment needs • Cox Business VoiceManager has more features than most phone systems • VoiceManager features are NETWORK-BASED - Can be accessed from anywhere (Voice Portal and My Account control) - Most features can be controlled from the sets with /# codes - Customer benefits from feature up
Cortelco 2700 Set Main Features • Caller ID with Call Waiting • 99 Caller ID Memory • Wide-angle LCD screen • Voice Mail Indication • Mute/Hold • On-Hook Pre-dial • Directory Name Match 4 • 10 Direct Memories • Flash/Redial • Speakerphone • 2.
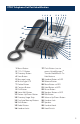
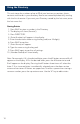
2700 Telephone Set Part Identification 1 2 3 4 5 6 7 8 9 29 28 27 10 26 11 12 13 14 15 16 17 18 25 1 2 3 4 5 6 7 8 9 10 11 12 13 14 15 16 Menu Button 7-10-11 Button Directory Button Save Button Message Lamp Multi-angle LCD Delete Button Contrast Button Dial Button Voice Mail Button Review Up/Down Button Directory/Logo Strip Five Auto Memory Buttons Shift Button Redial Button Headset Jacks 24 23 22 21 19 20 17 Flash Button (use to access VoiceManagerSM Transfer/Hold/Music On Hold feature 18 He
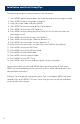
Installation and Quick Setup Tips The following are quick setup instructions for the phone: 1. Press MENU option button down for three seconds to enter program mode. 2. Press MENU to leave Language as English. 3. Enter your Area Code and press MENU. 4. Press MENU to skip the second Area Code option. 5. Press MENU to leave the LDS Code as 1. 6. Press MENU to skip setting the time (Caller ID will set the time when the phone gets a call). 7. Press MENU to skip Flash timer set at 600ms. 8.
Telephone Set Buttons FLASH Button Press the FLASH button to provide a line break to access services such as Three-Way Calling, Call Waiting or VoiceManager features such as music on hold and call transfer. Steps to use with call waiting service: 1. While having a conversation, another party calls and you hear a tone. 2. Press FLASH once and release. The first conversation is placed on hold and the second call can be answered. 3. Press FLASH again and release.
MUTE Button Press MUTE to speak without the person on the phone hearing your conversation. The MUTE indicator will light up and remain lighted until you resume your conversation. Also, “MIC MUTED” will show in the display. To un-mute the call and resume the conversation, press MUTE. The MUTE indicator will go out and your call can continue. Telephone Set Features – Speaker Button Receiving Incoming Calls • When the phone rings, press and release SPEAKER and speak normally into the built-in microphone.
Telephone Set Features HOLD Button Normal Mode: 1. Press HOLD and hang up the handset. HOLD will light up and remain lighted until you resume your conversation. 2. To resume your conversation, lift the handset or that of an extension phone on the same line or press and release SPEAKER. The HOLD indicator light will go out and your call can continue. Automatic Memory (Programmable Buttons) Note: Cox Business may preset some of the memory buttons for easy access to VoiceManager features. Storing a Number 1.
Using the Directory This unit stores the numbers of up to 99 of your business associates, clients, contacts and friends in your directory. Names are sorted alphabetically starting with the first character. If you want your Directory sorted by the last name, enter the last name first. Storing Entries 1. Press SAVE to store a number in the Directory. 2. The display will show (Save to?). 3. Press DIRECTORY. 4. (Enter Number) will appear in the display. 5.
Using the Directory (cont’d) Finding Items Press DIRECTORY to enter the Directory Review Mode. The first entry in the Directory is displayed. The Down and Up Review Arrows may be used to scroll through the Directory. To leave the Directory at any time, press DIRECTORY. Dialing Directory Numbers Find the number you want to dial in the Directory list. (Telephone can be on or off hook) when the number shows on the display press DIAL to start dialing. Deleting Individual Items 1. Enter the directory. 2.
Voice Portal Access the VoiceManager Voice Portal from any phone. The Voice Portal allows you to make changes to your call forwarding and initiate outbound calls that appear to originate from your office. First Time Setup 1. Initial setup must be done from your VoiceManagerSM telephone line. 2. Dial 9999# to reach the Voice Portal from your office. 3. When prompted, set up your pass code and record your name. 4. F ollow the prompts to set up call forwarding, change your status manager or initiate a call.
.Caller ID Features Call Waiting Display Call Waiting service alerts you to a new call by playing a tone while you are on a call. Call Waiting Caller ID not only tells you there is another call waiting but, lets you know who the caller is before the call is answered. The name and number of the incoming call will be shown on the unit’s display. This information will remain displayed for 16 seconds. In addition, the CALL WAITING symbol (CW) will flash. Receiving Calls 1.
Message Error – No Data Sent Message Error The display shows (-MESSAGE ERROR-) if your unit receives a call that has an error in the transmission or reception. No Data Sent The display shows (-NO DATA SENT-) if there is no Caller ID number sent from the telephone company. Private Calls • If the caller has exercised the option to block his number from being sent (PRIVATE NUMBER), his name will alternately display on the screen.
VoiceManager – Feature Descriptions SM Call Forward Activation 1. Lift telephone handset. Press the assigned code (ex. *72). 2. Enter phone number to which calls will be forwarded. 3. Replace telephone handset. The Call Forwarding Always service is on. Call Forward Deactivate 1. Lift telephone handset. Press the assigned code (ex. *73). 2. Replace telephone handset. The Call Forwarding Always service is off. For Call Forward All, Busy and No Answer, use above. Calling Line ID Delivery Blocking per Call 1.
VoiceManager — Most Frequently Used Features SM Feature Access Codes list the star codes for services that you have. To activate a service, hit the “*” key and the number followed by the “#” key. Some require additional information such as a phone number, but you are prompted for that information. You cannot change your feature access code.
Phone Does Not Ring 1. Line cord is disconnected at telephone outlet or at telephone. 2. Phone is OFF HOOK. Make certain the hook switch is depressed when the handset is in the cradle. 3. SPEAKERPHONE indicator is on. Turn off speakerphone. No Dial Tone Wire is disconnected at telephone or at wall jack. Test the telephone in a different wall jack. If it works, the first jack may be defective. Redial Button Does Not Function The telephone may be momentarily disconnected from the telephone jack.
coxbusiness.com Please refer to the Cortelco Owner’s Instruction Manual that came with your phone for Important Safety Instructions, FCC Information, Telephone Repair and Limited Warranty Information. Service and features not available in all areas. Some features may incur local usage charges in certain markets. Long distance rates will vary. Telephone modem equipment required. Modem uses electrical power to operate and has backup battery power provided by Cox if electricity is interrupted.