
User Guide

Datalog 3 - SMS Software Application Sheet
Molynx Visilynx CCTV Module - Page 5 of 6
CORTECH DEVELOPMENTS LTD
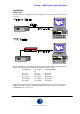
The same procedure can be used for switching PTZ cameras to the monitors. However,
there is added functionality for control of the PTZ units.
The buttons numbered 1 to 8 on the right of the form are for switching PTZ cameras to
their pre-set positions. These will be available to the user if they have been pre-configured
at editing time. To move a particular PTZ camera to any of the available pre-set positions,
simply click on the relevant camera icon and click on any of the buttons 1 to 8. If pre-set
positions are not available, then these buttons will be greyed out.
The central group of buttons, below the monitor selection icons, permit the following
operations:
•
Zoom in
•
Zoom out
•
Focus near
•
Focus far
•
Open iris
•
Close iris
•
Operate wiper
•
Operate wash
Hopefully these icons are self-explanatory, however a text description will appear at run-
time if the cursor is held directly over any particular button.
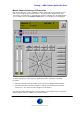
To the left of the form are two sliding bars, which enable the adjustment of pan and tilt
speeds. The markers can be dragged along these bars to adjust the speed between zero
and one hundred percent of the maximum permissible. These percentages will
subsequently be updated and displayed in the small windows below the sliding bars.
At program start, the speeds will default to 50%. If speeds are changed the value is stored
for each camera, for the duration of the program.
To the right of all the buttons described above, are the PTZ camera pan and tilt controls.
To pan and/or tilt any fully functional camera, just click on the relevant buttons displaying
the directional arrows. Click on the centre button to restore the camera to its home
position.
Select
Close
if you wish to end the current session.