This book contains many important safety messages. Always read and obey all safety messages. Installer:Leave these instructions with the range Important - Save the installation instructions for the local electrical inspector’s use.
WARNING If the information in this manual is not followed exactly, a fire or explosion may result causing property damage, personal injury or death. Do not store or use gasoline or other flammable vapors and liquids in the vicinity of this or any other range. WHAT TO DO IF YOU SMELL GAS Do not try to light any range. Do not touch any electrical switch Do not use any phone in your building. Immediately call your gas supplier from a neighbor’s phone. Follow the gas supplier’s instructions.
SERVICING WARNING WORK SAFELY Where necessary disconnect from electricity and gas before starting. Check range is safe when you have finished.
SERVICING WARNING WORK SAFELY Where necessary disconnect from electricity and gas before starting. Check range is safe when you have finished. Servicing Notes When servicing or replacing gas carrying components disconnect from gas before commencing operation and check range is gas sound after completion. When checking for gas leaks use a liquid leak detector at all joints and connections to check for leaks in the system. Use a product specifically manufactured for leak detection.
SERVICING WARNING WORK SAFELY Where necessary disconnect from electricity and gas before starting. Check range is safe when you have finished.
Checking the Multifunction Oven Check Result Possible Cause Light bulb failed (most likely cause) Open the oven door and turn on the oven light Light does not work No power to range Fault in power supply to switch Faulty switch Action Remove the light bulb (see ‘Servicing Procedures’). Check the bulb resistance with a meter and replace it if necessary. If the bulb is OK then move the range forward (see ‘Servicing Procedures’) and remove the rear cover.
Checking the Multifunction Oven 7
Checking the Convection Oven Check Result Possible Cause Light bulb failed (most likely cause) Open the oven door and turn on the oven light Light does not work No power to range Fault in power supply to switch Faulty switch Action Remove the light bulb (see ‘Servicing Procedures’). Check the bulb resistance with a meter and replace it if necessary. If the bulb is OK then move the range forward (see ‘Servicing Procedures’) and remove the rear cover.
Checking the Convection Oven 9
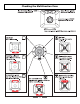
Checking the Cooktop Range Maintop Ignition The maintop burners have spark ignition operated by a switch on each control valve. When any burner control knob is pressed in the spark generator module produces sparks at all the burners ignition electrodes. Problem Check The ignition system Try lighting the burner with a match. makes sparks but does Are the flames even around the head with a blueish color? not light the gas Check the burner head is clean and the flame ports are clear.
Checking the Cooktop Problem Check The burner lights but the flame goes out when the control knob is released Each burner gas control valve includes a thermoelectric solenoid flame safety valve (FSD) that is normally closed. There is a sensor probe mounted on each burner. To light a burner the user must push in the control knob and turn to the full on position. Pushing in the knob overrides the safety valve and allows gas to flow to the burner while the knob is pushed in.
Servicing Section 1 How to change an oven light bulb 13 2 How To Move the Range for Servicing 13 3 To Remove the Cooktop 15 4 To Remove the Control Panel 16 5 To Remove an Outer Side Panel 16 6 To Remove an Oven Neon 16 7 To Change Oven Light Switch 17 8. To Remove a Thermostat 17 9 To Change a Multifunction oven function switch 18 10 To Remove an Oven element Thermal Cut-Out.
SERVICING WARNING WORK SAFELY Where necessary disconnect from electricity and gas before starting. Check range is safe when you have finished. 1 How to change an oven light bulb Replacement bulb must be 15w 125-130v lamp, FOR OVENS, heat resistant to 300°C (570°F). Turn off the power at the circuit breaker Make sure the oven is cool. Open the oven door and remove the oven racks. Unscrew the bulb cover by turning counter clockwise. It may be very stiff.
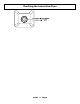
SERVICING WARNING WORK SAFELY Where necessary disconnect from electricity and gas before starting. Check range is safe when you have finished. Fit the Allen key tool to the center roller lowering mechanism (C in the fig.). Lower the front roller by turning the Allen key clockwise until the front feet are just clear of the floor.
SERVICING WARNING WORK SAFELY Where necessary disconnect from electricity and gas before starting. Check range is safe when you have finished. 3 To Remove the Cooktop Move the range away from the wall - see ‘How To Move the Range for Servicing’. Remove cooktop grates and burner heads. Undo the large brass nuts and remove the brass venturis and washers. Lift up the front of the cooktop top and prop it up. Disconnect the ignition leads from the electrodes and remove the burner bezels.
SERVICING WARNING WORK SAFELY Where necessary disconnect from electricity and gas before starting. Check range is safe when you have finished. 4 To Remove the Control Panel Remove all the control knobs. Open both oven doors. Remove 3 fixings on the top front and 3 fixings on the control panel underside. Pull the control panel forward. It may be difficult to move the control panel because it is held by the cooktop.
SERVICING WARNING WORK SAFELY Where necessary disconnect from electricity and gas before starting. Check range is safe when you have finished. 7 To Change Oven Light Switch Remove control panel (see 2). NB The old switch may be destroyed during removal. Remove switch button and old switch from its bezel by gripping the switch body behind the control panel and twisting sharply. The switch bezel can then be removed by folding back its locking wings and pushing forward.
SERVICING WARNING WORK SAFELY Where necessary disconnect from electricity and gas before starting. Check range is safe when you have finished. Left Hand Multifunction oven From inside the oven remove the two screws holding the thermostat phial to the oven fan cover at the rear of the oven. Feed the thermostat capillary out of and clear of the oven noting the routing. Disconnect the wires from the thermostat and undo the two fixings which secure the control to the mounting plate.
SERVICING WARNING WORK SAFELY Where necessary disconnect from electricity and gas before starting. Check range is safe when you have finished. 11 To Remove a Cooktop Valve Remove the cooktop and control panel, see 1 and 2. Unplug the FSD lead from the rear of the valve. Undo compression fitting at the rear of the valve. Remove the fixings that secure the valve to the gas rail. Disconnect the ignition switch wiring. Remove the valve. Remove and discard the gasket seal.
SERVICING WARNING WORK SAFELY Where necessary disconnect from electricity and gas before starting. Check range is safe when you have finished. Remove the nut holding the nut holding FSD probe to the burner mounting cross member. Fit the new FSD probe, plug into the back of the control valve Reassemble in reverse order and check for correct burner operation. 13 To Change an Ignition Switch Change the gas valve as detailed in Section 9.
SERVICING WARNING WORK SAFELY Where necessary disconnect from electricity and gas before starting. Check range is safe when you have finished. 15 To Remove a Cooktop Burner Spark Electrode Remove the cooktop grate and burner head. Undo the large brass nut and remove the brass venturi. Lift up the burner bezel. The spark ignition wire will be pulled through the electrode clearance hole. Disconnect the spark electrode from the ignition wire.
SERVICING WARNING WORK SAFELY Where necessary disconnect from electricity and gas before starting. Check range is safe when you have finished. 17 To Adjust the Oven Door Angle The oven doors are very heavy. Transit of the range can cause the oven doors to move so that they are not correctly aligned. Both oven doors are fitted with adjustable door bottom hinges. The hinges can be adjusted to alter the angle of the door.
SERVICING WARNING WORK SAFELY Where necessary disconnect from electricity and gas before starting. Check range is safe when you have finished. 18 To Change the Oven Outer Door Panel or Door Trim Parts The door outer panel and all the trim parts are available as separate parts so that individual parts can be changed. Door is very heavy - take care. Unscrew the door handle and remove the handle and door trim handle disk.. Open the oven door.
SERVICING WARNING WORK SAFELY Where necessary disconnect from electricity and gas before starting. Check range is safe when you have finished. 19 To Remove an Oven Door Door is very heavy - take care. Open the oven door. Loosen the two top hinge screws. Support the weight of the door and remove the screw nearest the hinge pin. Swing the hinge up and away from the hinge pin on the door. Lift the door away from the bottom hinge. Re-assemble in reverse order.
SERVICING WARNING WORK SAFELY Where necessary disconnect from electricity and gas before starting. Check range is safe when you have finished. 21 To Remove the Door Latch Remove the oven outer door panel as detailed in Section 18. Remove the fixings that secure the latch assembly to the inner door panel. Fit the replacement catch and re-assemble in reverse order. Check correct operation of door. 22 To Remove the Oven Door Seal Open oven door. The seal is held in place by small hooks on the rear face.
SERVICING WARNING WORK SAFELY Where necessary disconnect from electricity and gas before starting. Check range is safe when you have finished. 24 To Remove the Cooktop Spark Generator Pull the range forward to access the covers at the rear of the range; see the section ‘How To Move the Range for Servicing’. From the rear remove the right hand (when viewed from the rear) rear cover and disconnect all the leads at the generator.
SERVICING WARNING WORK SAFELY Where necessary disconnect from electricity and gas before starting. Check range is safe when you have finished. 27 To Replace an Oven Fan Pull the range forward to access the cover boxes at the rear of the range, see the section ‘How To Move the Range for Servicing’. Remove the fixings that secure the cover and lift it clear. Remove the fan wiring, noting the connection positions. Remove the inner back as detailed in Section 26.
SERVICING WARNING WORK SAFELY Where necessary disconnect from electricity and gas before starting. Check range is safe when you have finished. 29 To Remove the Left Hand Multifunction Oven Bottom and Top Elements Bottom Element Pull the range forward to access the rear of the range, see the section ‘How To Move the Range for Servicing’. Remove the fixings that secure the right hand (when viewed from the rear) cover and lift it clear. Remove the 2 screws ‘A’ and allow the plate to drop down.
SERVICING WARNING WORK SAFELY Where necessary disconnect from electricity and gas before starting. Check range is safe when you have finished. 30 To change the Cooling fan Pull the range forward to access the rear of the range, see the section ‘How To Move the Range for Servicing’. Remove the cooling fan cover (4 screws) Remove the 6 screws holding the fan mounting bracket to the range back. Pull the fan and mounting bracket out and disconnect the wiring.
SERVICING WARNING WORK SAFELY Where necessary disconnect from electricity and gas before starting. Check range is safe when you have finished.
Schematic diagram of the Range Caution: Label all wires prior to disconnection when servicing controls. Wiring errors can cause improper and dangerous operation. Verify proper operation after servicing.
SERVICING WARNING WORK SAFELY Where necessary disconnect from electricity and gas before starting. Check range is safe when you have finished. Technical Data This range is supplied set for Natural gas. A conversion kit from Natural Gas to Propane gas is included. INSTALLER: Please leave these instructions with the User. DATA BADGE LOCATION: instructions. Inside base of drawer cavity - remove drawer.
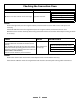
SERVICING WARNING WORK SAFELY Where necessary disconnect from electricity and gas before starting. Check range is safe when you have finished. Ovens Left hand Multifunction Oven Fan element Top element Browning Element Bottom element Right hand Convection Oven 2500W 1200W 1150W 1000W 2500W Maximum total electrical load at 240V 5100 W (approximate total including oven lights, oven fan etc.
060106