
User's Manual


Voasis™ Access Pod (VAP) Installation and Monitoring
28 Voasis™ UMTS/DCS/PCS Installation and Configuration Manual
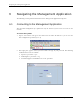
5.2.2 Wall Mount
• Assemble the wall-mount adaptor to the VAP (The adaptor screws, wall mount screws, sticky
tape and cable are included in the VAP kit as described in
Table 5-1: VAP Kit)
• Connect the RJ-45 jumper cable (CAT-5/6) to the VAP
• Attach the VAP to the wall according to the planed location using supplied screws (for “anti-
theft” installation) or the double sided sticky tape for the wall-mount adaptor (for “plug-and-
play” installation)
• Plug the other side of the cable into adjacent standard (RJ-45) Ethernet connection jack.
• Verify the VAP receives power and sync up to the VCU via the LEDs on the unit.
+ =
5.2.3 Jack Mount
The VAP can also be fitted onto an RJ-45 jack. This requires separately ordered brackets that are
customized according to customer site requirements.
5.3 Verifying Coverage
Verify coverage in the areas, adding and moving VAPs for optimal coverage according to the
principles described in
3.3.
Wallmount adapto
r
A
ccess POD
A
ssembl
y