
User's Manual

VAP Installation and Provisioning
Dual-Band MobileAccessVE Instant Coverage Solution User Manual 35
5.1.2 VAP Locations and Mounting
It is recommended to place the VAPs on top of desks, cubical walls, filing cabinets, or higher on
walls so as to maximize the provided coverage per VAP.
Note: Mounting a VAP beneath a desk or in another secluded location (e.g. office corner)
decreases the effective coverage of the VAP increasing the need for a higher number of VAPs to
cover the same area.
When installing the VAPs, consider the following:
Placing units in an open area.
Availability of CAT-5e/6 infrastructure.
The VAPs plug into standard (RJ-45) Ethernet connection jacks.
If the jack being used is already connected to Ethernet switch. For more information see 3.4.2
and 4.3.1.
Aesthetics of the VAP location.
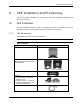
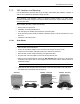
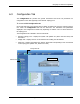
5.1.2.1 Desk Mount
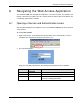
Note: All components (adaptor, screws, and cables) are included in the VAP Kit.
Place the VAP on the Desk Mount.
Secure the Desk Mount adaptor to the VE Access Pod using the (4) short screws.
Connect the RJ-45 jumper cable (CAT-5e/6) to the VAP’s RJ-45 connector.
Place the VAP on a flat surface according to the planned location.
Plug the other end of the cable into the VCUs (RJ-45) Ethernet jack.
When using an external antenna, connect the Ext. Antenna SMA connector(s) to the external
antenna(s). This option must be SW configured via the web GUI. (Note: Internal antenna is
enabled by default).
Note: The maximum external antenna gain should not exceed 10 dBi.
Verify that the VAP receives power and connects to the VCU via the LEDs on the unit (both
the GREEN LED and the BLUE LED should be lit).
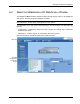
Desk Mount Adaptor
Ext. Antenna SMA
connectors*
RJ-45 to
computer
RJ-45 to
VCU
Access Pod
Assembly - Front View
Assembly - Rear View
Activity –
Blue LED
Pwr –
Green LED
+
=