
User's Manual


Mounting I P/N 709C011101 I Page 17
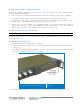
3.4.1.2 Rack Installation Safety Instructions
Review the following guidelines to help ensure your safety and protect the equipment from
damage during the installation.
• Only trained and qualified personnel should be allowed to install or replace this equipment.
• Verify that ambient temperature of the environment does not exceed 50°C (122°F)
• To maintain a low center of gravity, ensure that heavier equipment is installed near the
bottom of the rack and load the rack from the bottom to the top.
• Ensure that adequate airflow and ventilation within the rack and around the installed
components so that the safety of the equipment is not compromised. It is recommended to
allow for at least about 2 cm of airspace between devices in the rack.
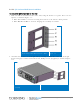
3.4.1.3 Mounting QX Unit in 19-IN Rack
NOTE: The QX can also be mounted on wall – see section 3.4.2
Install the QX in the 19-in rack below the SCU-F (recommended) and secure with pre-
assembled rack ears.
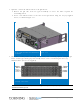
3.4.1.4 Mounting SCU-F Unit
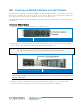
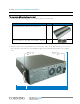
1. Assemble the SCU-F Routing Bracket as follows:
• Unscrew the two screws located on the far right of the SCU-F front panel. Save the screws
for next step.
• Assemble the supplied Routing Bracket on to the right side of the SCU-F front panel using
the two screws previously removed. See Figure
3-6.
SCU-F with Assembled Routing Bracket Figure 3-6
2. Install the SCU-F unit in the 19-in rack and secure with the factory-assembled rack ears.