
User's Manual


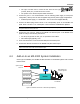


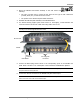
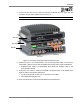
Table Of Contents
- Preface Material
- Product Certifications
- Company Certification
- Introduction to the MA-860 System
- Element Descriptions
- Infrastructure Preparation
- Installation
- Power-up and Provisioning the Unit
- Appendix

Installation
MA-860 Installation and Configuration Guide 21
4.2 Placing the Unit and Recording Location
MobileAccess MA-860 is typically installed in the communication shaft or cabinet of each floor
to which WLAN coverage is to be supported. The accessories, mounting and installation
procedures vary depending on the installation configuration.
4.3 Standalone Wall Mount Installation
MA 860
b/g
Antenna Ports
802.11
AP #1
a
b/g
802.11
AP #2
a
b/g
802.11
AP #3
a
b/g
802.11
AP #4
a
b/g
4
1
2
3
a
a
a
AP 1
b/g
b/g
b/g
a
AP 2
AP 3
AP 4
4
4
3
3
2
2
WCE
1
1
WCE
WCE
WCE
WLAN
CH-11
WLAN
CH-1
WLAN
CH-1
WLAN
CH-6
Figure 4-1. MA-860 Standalone Installation Configuration
NOTE: It is recommended to record the location of the units according to the MAC addresses
on the sticker at the rear of the units near the Ethernet port.
Although it is not required for a stand-alone installation, it is recommended to set the supplied
cable 705102101 aside (usually used when MA-860 is installed in an add-on configuration).You
will need it if you want to upgrade your system to provide additional coverage options.
ATTENTION: Use SMA wrench for the SMA connectors, do not over tighten the
connectors.
To install MA 860 wallmount standalone configuration
1. Mount the MA-860 on the wall using four screws. When mounting, consider the following: