
User's Manual
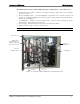
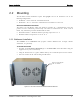
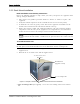
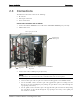
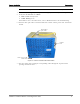
Table Of Contents
- Reporting Defects
- NOTE: Keep all packing material until you have completed the inspection
- Compliance with RF safety requirements:
- MobileAccess products have no inherent significant RF radiation.
- Compliance with RF safety requirements:
- ISO ISO 9001: 2000 and ISO 13485: 2003
- About this Guide and Other Relevant Documentation
- Table of Contents
- Introduction to HX System
- System Installation
- Rack Brackets (supplied screws)
- Commissioning MA Head-End
- Provisioning the MobileAccessHX
- Appendix A: System Specifications
- Appendix B: Ordering Information
- Appendix C: Site Preparation

System Installation Mounting
MobileAccessHX Installation and Configuration Guide 9
2.2.2 Rack Mount Installation
Rack Installation General Safety Instructions
Review the following guidelines to help ensure your safety and protect the equipment from
damage during the installation.
• Only trained and qualified personnel should be allowed to install or replace this
equipment.
• Verify that ambient temperature of the environment does not exceed 50°C (122°F)
• To maintain a low center of gravity, ensure that heavier equipment is installed near the
bottom of the rack and load the rack from the bottom to the top.
• Ensure that adequate airflow and ventilation within the rack and around the installed
components so that the safety of the equipment is not compromised. It is recommended
to allow for at least about 2 cm of airspace between devices in the rack.
NOTE: The cabinet requires a clearance of 10 cm above the unit. If a heating source is
installed beneath the HC cabinet, a buffer must be placed between the cabinet and the
surface.
To install HX unit in rack
NOTE: Plan the location of the unit in the rack. If there is a heat emmitting device located below
the unit, place a heat absorbent buffer between the HX cabinet and heat emitting device.
1. Assemble the RACK MOUNT BRACKETS (2) to the SIDE PANELS of the HX cabinet using the
supplied screws.
2. Mount in the 19” rack and secure with the supplied screws.
Figure 2-2. Example of Similar Indoor Cabinet with Rack Brackets and Heat Buffer
3. Heat absorbing buffer (not supplied) – in case of a heat emitting sources located below
unit.
10 cm clearance above
HX cabinet
Rack Brackets
(supplied screws)
Heat absorbing buffer