
User's Manual
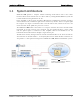
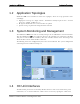
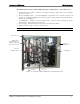
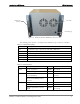
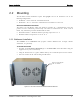
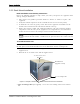
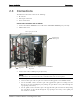
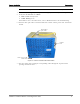
Table Of Contents
- Reporting Defects
- NOTE: Keep all packing material until you have completed the inspection
- Compliance with RF safety requirements:
- MobileAccess products have no inherent significant RF radiation.
- Compliance with RF safety requirements:
- ISO ISO 9001: 2000 and ISO 13485: 2003
- About this Guide and Other Relevant Documentation
- Table of Contents
- Introduction to HX System
- System Installation
- Rack Brackets (supplied screws)
- Commissioning MA Head-End
- Provisioning the MobileAccessHX
- Appendix A: System Specifications
- Appendix B: Ordering Information
- Appendix C: Site Preparation

System Installation Mounting
MobileAccessHX Installation and Configuration Guide 8
2.2 Mounting
The HX indoor model installation requires two people and can be installed in one of the
following configurations:
• Wallmount - on the wall in the communication room
• Rackmount – in a 19” rack in the
communication room
allocated to that area.
General Installation Instructions
The Indoor type HX Remote Units unit should be installed in a communication room that
provides access to authorized personnel only. The units are maintenance free. In the event of
failure, only authorized personnel should handle the units.
• Environmental Data - Maximum ambient operating temperature: 50° C
• Maximum ambient temperature in a rack: 45° C
2.2.1 Wallmount Installation
The EXAMPLE is for CONCRETE walls (requires anchors McMaster-Carr catalogue number
92403A200, or equivalent).
To mount HX on wall
1. Assemble the WALL MOUNT BRACKETS (2) to the REAR PANEL of the HX cabinet using the
supplied screws (4 for each bracket).
2. Using the bracket holes as a guide, drill four holes (2 for each bracket) for concrete anchors.
3. Insert the anchors in the wall and hang the HX cabinet.
Figure 2-1. HX Indoor Unit with Assembled Wallmount Brackets
Holes for hanging HX
unit on anchors