
User's Manual
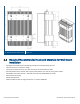


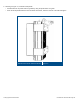


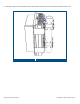


Table Of Contents
- 1 Introduction
- 2 Installation Guidelines
- 3 HX Indoor Physical Installation
- 4 HX Outdoor Physical Installation
- 5 Appendix A: System Specifications
- 6 Appendix B: Ordering Information
- 7 Appendix C: HX Outdoor Non-Standard Connector Descriptions
- 8 Appendix D: Power Cable Specifications
Corning Optical Communications User Manual I CMA-066-AEN I Page 45
4.5.2 Pole Mount Installation
The pole mount installation procedure consists of positioning the pole clamps on the pole and mounting the HX Outdoor unit
on them.
Note the following:
• Provided pole mounting accessories are designed for the pole radius thickness range, Ø63 – Ø95 mm
• The pole mount installation requires the following provided items (see section
4.2):
• (4) Pole clamps
• (8) Washer, Flat, 3/8"
• (8) Nut, 3/8, DIN 934 -3/8 UNC
• (8) Washer, Spring, 3/8"
• (8) Screw, Hex Cap, 3/8 x6", Head
To pole-mount the HX Outdoor Unit
1. Select the appropriate location according to the following criteria:
• Accessibility
• Antenna location and distance
2. Position and hold an outer top bracket on the pole.
3. Insert supplied spring washer and screw-hex-cap (four per bracket) momentarily support it with your hands.
4. Fit the screws through the inner clamp and secure loosely so that the distance between the clamps is adjustable.