
Installation manual


8
630460001
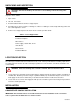
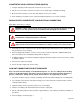
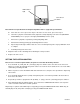
Figure 1
Cancel/Pour
Switch
LED Indicator
Light
Note: Check local specifications for dispensed product water to syrup ratio specifications.
G. If the ratios are correct, proceed to Step I. If the ratios are not correct, proceed to step H.
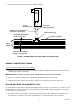
H. Turn valve syrup flow control labeled “S4” (right-side control) adjusting screw to the left (COUNTER-
CLOCKWISE) for less syrup or to the right (CLOCKWISE) for more syrup.
I. Remove the syrup/water separator by turning and pulling down.
J. Reinstall the nozzle by pushing up and turning until it is locked.
K. Repeat Steps E through J until the ratios are correct on all dispensing valves. Syrup calibration check
is complete.
L. Install dispensing valve front cover.
2. Adjust the ratios for the remaining valves following the same procedure.
3. Replace the valve covers.
SETTING THE PORTION CONTROL
Note: In case of electrical power failure, the portion control has full memory function.
1. Press and hold “S” (small) and “XL” (extra-large) dispense switches at the same time on the front cover
until for 3 seconds, after that time the portion control ”set mode” has been activated. The “set mode” will be
confirmed by a flashing red LED.
2. Fill the cup to be used for small drinks with desired amount of ice, then place the cup under the dispensing
valve nozzle.
3. Press and hold switch labeled “S” (small) on dispensing valve cover until cup is filled to the desired level,
then release the switch.
4. Repeat Steps 2 and 3 to program the “M” (medium), “L” (large), and “XL” (extra-large) dispense switches.
5. After adjusting all dispensed drink volumes, press and release CANCEL/POUR switch to cancel portion
control “set mode” and return to normal operation.
Dispensing of a portion control drink may be stopped by pressing the CANCEL/POUR switch. Drinks may be
manually dispensed (non-portion control) by pressing the CANCEL/POUR switch.