JETSPRAY JS7 Visual Display Dispenser Series Owner’s Manual Release Date: September 01, 1995 Publication Number: 18478 Revision Date: March 19, 2015 Revision: G Visit the Cornelius web site at www.cornelius.com for all your Literature needs.
The products, technical information, and instructions contained in this manual are subject to change without notice. These instructions are not intended to cover all details or variations of the equipment, nor to provide for every possible contingency in the installation, operation or maintenance of this equipment. This manual assumes that the person(s) working on the equipment have been trained and are skilled in working with electrical, plumbing, pneumatic, and mechanical equipment.
TABLE OF CONTENTS Safety Instructions. . . . . . . . . . . . . . . . . . . . . . . . . . . . . . . . . . . . . . . . . . . . . . . . . . . . . . . . . . . . . . . . . 1 Read and Follow ALL Safety Instructions . . . . . . . . . . . . . . . . . . . . . . . . . . . . . . . . . . . . . . . . . . . . . 1 Safety Overview . . . . . . . . . . . . . . . . . . . . . . . . . . . . . . . . . . . . . . . . . . . . . . . . . . . . . . . . . . . . . . 1 Recognition . . . . . . . . . . . . . . . . . . . . . . . . . . . . .
JetSpray JS7 Owner’s Manual SAFETY INSTRUCTIONS READ AND FOLLOW ALL SAFETY INSTRUCTIONS Safety Overview • Read and follow ALL SAFETY INSTRUCTIONS in this manual and any warning/caution labels on the unit (decals, labels or laminated cards). • Read and understand ALL applicable OSHA (Occupational Safety and Health Administration) safety regulations before operating this unit. Recognition Recognize Safety Alerts ! This is the safety alert symbol.
JetSpray JS7 Owner’s Manual SAFETY PRECAUTIONS This unit has been specifically designed to provide protection against personal injury. To ensure continued protection observe the following: ! WARNING: Disconnect power to the unit before servicing following all lock out/tag out procedures established by the user. Verify all of the power is off to the unit before any work is performed. Failure to disconnect the power could result in serious injury, death or equipment damage.
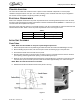
JetSpray JS7 Owner’s Manual SYSTEM OVERVIEW The Jets pray JS7 dispenser is a counter top visual display beverage dispenser. It is designed to dispense a variety of pre-mixed products. The unit has a refrigeration system to chill product and a spray system for circulating the product in the bowl. ! WARNING: This unit must be grounded to avoid possible electrical shock to the operator. The unit power cord is equipped with a three pronged plug.
JetSpray JS7 Owner’s Manual INSTALLATION ! WARNING: This unit must be grounded to avoid possible electrical shock to the operator. The unit power cord is equipped with a three pronged plug. If a three pronged (grounded) outlet is not available use an appropriate method to ground the unit. Failure to comply could result in serious injury, death or damage to the equipment. DELIVERY, INSPECTION & UNPACKING NOTE: Cornelius is not responsible for damaged freight.
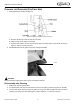
JetSpray JS7 Owner’s Manual COUNTER LOCATION The unit must be located with at least 3 inches of space on back and sides of dispenser, to ensure proper ventilation. Keep space above unit open. Lint or dust collecting on the condenser will result in poor refrigeration. The counter must be capable of supporting 100 lbs. (45.36 kg). ELECTRICAL REQUIREMENTS Refer to the nameplate to determine the power requirements before connecting electrical power to the unit.
JetSpray JS7 Owner’s Manual CLEANING THE DISPENSER (FOR FIRST USE) 1. Removing the push handles. See Figure 3. Figure 3. A. Push the handle back until it touches the front panel. B. Grasp the clips on the sides of the handle. C. Squeeze clips until they are free from the panel, then pull straight down on the handle as shown in Figure 4, until it is free from the panel. 2. Disassemble the bowl, lid, gasket, and pump housing assemblies. Lock Figure 4. ! CAUTION: Abrasive cleaners scratch plastic parts.
JetSpray JS7 Owner’s Manual Bowl Gasket 3 5 7 2 1 8 6 4 Figure 5. 4. Check that the bowl spout gasket is mounted properly to the base assembly, as shown in Figure 6. Bowl Spout Gasket Pinch Tube Figure 6. 5. Slide the bowl over the cooling coil and assemble the bowl to the dispenser. Be careful not to wrinkle the gasket. If gasket is wrinkled, beverage will leak out of bowl. (See Figure 7.) Place Bowl on Top of Unit Cooling Coil Figure 7. 6. Replace the push handle and pinch tube. A.
JetSpray JS7 Owner’s Manual Figure 8. B. Remove pinch tube from the plastic bag and wash it. C. Before installing, wet the bowl spout surface and pinch tube. Push back the handle until it stops. D. Carefully insert pinch tube into the bowl spout opening and on into the lower opening of the handle support spout (See Figure 3.). Make sure the end of the tube does not get caught on the edge above the handle support spout opening. Pull the end of the tube to seat it firmly into the bowl spout seat.
JetSpray JS7 Owner’s Manual MAINTENANCE PROCEDURES CLEANING THE BOWL (DAILY) ! WARNING: Disconnect power to the unit before servicing. Follow all lock out/tag out procedures established by the user. Verify all power is off to the unit before performing any work. Failure to comply could result in serious injury, death or damage to the equipment. 1. Turn off power to the unit. 2. Before removing the bowl, turn off the spray switch. 3. Drain any product left in the bowl. 4.
JetSpray JS7 Owner’s Manual Sanitizing the Unit After cleaning, add one gallon of water at a temperature of between 75°F (24°C) and 100°F (38°C) to the bowl. Mix approved powdered chlorine sanitizer* according to manufacturers instructions. When dissolved, pour into bowl. Replace the lid and run the unit for two or three minutes. Shut off the unit and drain the contents through the pinch tube valve. *Kay-5 sanitizer or equivalent powder or liquid sanitizer.
JetSpray JS7 Owner’s Manual TROUBLESHOOTING GUIDE BOWL LEAKS 1. Do not confuse condensation on the outside of the bowl with bowl or faucet leaks. High humidity causes condensation on the bowl. 2. Be sure that the bowl gasket has been installed properly. Check the gasket for tears or cuts in the rubber. Tears cause leaks in the gasket. Replace the gasket if it is torn. 3. Remove and inspect the pinch tube for holes. Replace it if it is damaged. Figure 12.
JetSpray JS7 Owner’s Manual SPECIFICATIONS Table 2. Sizes and Weights in. Wide X 19 in. Long X 26.625 in. High (19.7 cm Wide Size/Dimensions 7-3/4 X 48.3 cm Long X 67.7 cm High) Shipping Weight Base Only: 45 lbs. (20.4 kg) Base Only: 36.5 lbs. (16.6 kg) Net Weight Large Bowl: 3.5 lbs. (1.59 kg) Small Bowl: 2.5 lbs. (1.13 kg) (optional) Bowl Capacity Large bowl: Over 5 US gallons (19 liters) Small bowl: Over 3 US gallons (11.4 liters) (optional) Materials of Construction Power Cord 7 ft.
Cornelius Inc. www.cornelius.