
Installation Guide
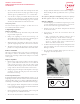
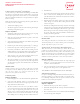

Run a continuous bead of adhesive around
perimeter of sheets and cutouts.
CORIAN
®
SOLID SURFACE
FABRICATION/INSTALLATION FUNDAMENTALS
NA/ENGLISH
Corian® Solid Surface Fabrication/Installation Fundamentals 4/6
3. Always sand off any chatter marks, nicks and chips from the back
edge nearest the wall and ease any sharp edges. Round over upper
and lower edges of top behind cutouts to a
1
/16" (1.5 mm) radius.
4. Once the scribe is complete, place laminate shims between the wall
and the reverse side of the Corian® top. Make the shims long enough
so that they can be removed easily. is will give a gap of
1
/16" (1.5 mm),
which may be caulked with silicone sealant later if needed.
9. Preparing Seams
For seams with front edges not exceeding 2" (51 mm), there are two
most commonly used methods as follows.
A. Single-Edge Preparation
Steps to completion:
1. Use a router, minimum 2-hp, fitted with a sharp, double- fluted
tungsten carbide straight cutter.
2. Clamp a true straightedge to both sides of the countertop to be
adjusted. Measure the base plate of the router to the leading edge of
the router bit and adjust to suit the cut accordingly.
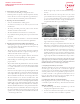
3. Working from left to right, firmly press the base plate of the router
against the straightedge and proceed to remove the excess material.
4. is method of preparing the edge will give a straight, square and
parallel cut. A second pass should be made to reduce chatter marks.
B. Mirror Cut Method
is term is used when both edges of the seam are cut simultaneously.
e technique is similar to that described in method A. Single Edge
Preparation, the only change is that both sides of the pieces to be seamed
are cut together.
Steps to completion:
1. Bring both parts of the countertop parallel to each other, allowing a
gap
1
/8" (3 mm) smaller than the router bit to be used. Rout the
seam by moving from left to right; each edge will be routed
simultaneously. is should give a perfect seam every time. Before
routing, make sure the sheets are flat and level to ensure best fit.
2. When preparing seams with high coved backsplashes or front edges
exceeding 2" (51 mm), the routing may need to be done from the
back side of the countertop.
10. Full-height Backsplashes
If a full-height backsplash will be installed behind the countertop (i.e. the
backsplash goes below the level of the deck and is between the deck and the
wall), this should be done prior to seaming. A full-height backsplash is a
small example of wall cladding and the same installation instructions apply.
• Before applying the Corian® backsplash, the wall to be clad should
be smooth and free from dirt and grime. Use denatured alcohol and
a clean cotton cloth for this purpose.
• Corian® backsplashes can be applied directly against existing wall
tiles as long as they are sound and well secured.
• All cutouts for electrical sockets, etc., MUST be made with a router.
• All edges should be sanded with 100-micron (P150) sandpaper to
finish, including the back edge behind the cutouts as previously
described.
Do not fabricate a full-height coved backsplash (
1
/4" [6 mm] or
1
/2" [12 mm]).
e chance of fracture at the cove due to building settling is too great.
Steps to completion:
1. Cut all backsplash pieces and trial-fit. An expansion space of 1/16"
(1.5 mm) minimum must be allowed. Expansion space must be
allowed at return walls and at upper and lower cabinets.
2. Clean the reverse side of the Corian® backsplash with denatured
alcohol and a clean cloth.
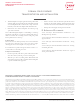
3. Apply silicone to the reverse side of the Corian® sheet in the
following manner.
• Apply a continuous bead of adhesive around the sheet of
Corian® approximately 1" (25 mm) from the outside edge.
• en run a bead in an “S” pattern, within the inside area. Any
cutouts (e.g., electrical sockets) require a continuous bead of
adhesive 1" (25 mm) in from the cutout.
4. To eliminate the need for bracing the Corian® backsplash, hot-melt
glue can be applied to the reverse side of the sheet shortly before
adhering it to the wall.
5. Press the Corian® backsplash firmly against the wall. Use a
straightedge to check for any deviation.
Figure C-2