
User's Manual
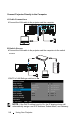
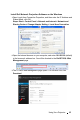
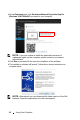
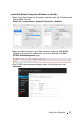
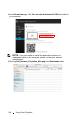


Table Of Contents
- About Your Dell Projector
- Adjusting Projector Image
- Using Your Projector
- Using Network Display
- Configure Your Projector for Network Display
- Connect Projector Directly to the Computer
- Install Dell Network Projection Software on the Windows
- Install Dell Network Projection Software on the Mac
- Using the Dell Network Projection App (Windows)
- Using the Dell Network Projection App (Mac)
- Split Screen
- Understanding the Buttons
- Using PC-Free Presentation
- Set-up Bluetooth Speaker
- Using High Dynamic Range (HDR)
- Using Network Display
- Troubleshooting
- Maintenance
- Specifications
- Additional Information
- Contacting Dell

26 Using Your Projector
4
At the
Download
page, click
Download Network Projection App For
Windows 10/8/7/Vista/XP
and install to your computer.
NOTE: If you are unable to install the application because of
inadequate rights on the computer, please contact your network
administrator.
5
Click
Run
to proceed with the one-time installation of the software.
6
The installation software will launch. Follow the on-screen instructions to
complete setup.
NOTE: Alternatively you can download the latest version of the Dell
Network Projection application from dell.com/support