
Operation Manual


Corel VideoStudio Pro X8 Reviewer’s Guide [ 12 ]
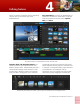
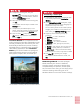
Advanced disc authoring: VideoStudio Pro
provides a robust disc authoring solution that
makes it easy to create professional-looking DVD,
AVCHD, or Blu-ray discs with menu navigation.
You can export single clips from the disc
authoring interface, edit and create disc subtitles,
add custom disc menu icons, print disc labels,
and show or hide DVD subtitles. In addition, you
can use Multi-trim video to extract multiple clips,
join or separate videos, and undo any changes
that you’ve made in haste.
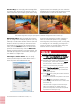
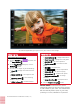
Motion tracking: VideoStudio Pro X8 can
automatically track moving objects and attach
graphics, offering exciting creative possibilities.
You can also use motion tracking to animate still
images and titles, combine separately filmed
elements, create exhilarating audio effects, and
much more.
You simply choose a point or area in a video, such
as a person walking, a bouncing ball, or the
license plates on a moving vehicle, and
VideoStudio Pro will automatically generate a
tracking path. The tracking path is fully
customizable, and lets you link audio, graphics,
titles, and video to a moving element in your
video.
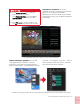
The motion tracking functionality lets you create
animated titles, graphics, and video clips that follow
onscreen elements.
Give it a try
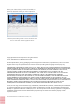
Working with multi-layer graphics
1 In the Edit workspace, drag any multi-layered
.pspimage file from the Library to the
Timeline.
Layered images are identified by a layer icon in
the upper-right corner of the thumbnail.
VideoStudio Pro X8 will distribute each layer
of the graphic to a separate track.
You can also press and hold the
Shift key
when dragging an image file to the Timeline.
This will flatten the image, so you will lose the
ability to animate and edit individual layers.
2 Click on the image file in any track to edit that
layer.
Give it a try
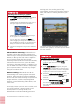
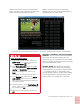
Tracking motion in a video
1 Drag a video clip to the Video Track in the
Timeline, right-click and choose
Track
Motion
.
2 In the
Track Motion dialog box, drag the
Tracker to a point that you want to track.
As you drag the Tracker, the area is magnified
to give you a closer view of your selection.
3 Enable the
Add matched object option, and
choose an option from the
Position drop-
down list.
4 Enable the
Show tracking path button ,
and click the
Track Motion button.
The video plays as the tracking path is
generated.