
User guide

88 Corel VideoStudio Pro User Guide
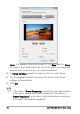
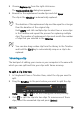
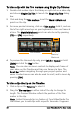
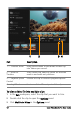
To trim a clip with the Trim markers using Single Clip Trimmer
1 Double-click a video clip in the Library or right-click on a video clip
and choose Single Clip Trim to launch the Single Clip Trim dialog
box.
2 Click and drag the Trim ma rkers to set the Mark-in/Mark-out
points on the clip.
3 For more precise trimming, click on a Trim mark er, hold it, and use
the left or right arrow keys on your keyboard to trim one frame at
a time. The Mark-in/Mark-out points can also be set by pressing
[F3] and [F4], respectively.
4 To preview the trimmed clip only, press [Shift + Space] or hold
[Shift] and click the Play button.
Note: You can also use zoom controls to display each frame of
your video on the Timeline and trim one frame at a time. The
Scroll Bar makes navigating through your project quicker and
easier. A wheel mouse can also be used to scroll, and to zoom by
pressing [Ctrl].
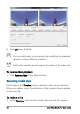
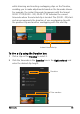
To trim a clip directly on the Timeline
1 Click a clip on the Timeline to select it.
2 Drag the Trim markers on either side of the clip to change its
length. The Preview Window reflects the position of the Trim
marker in the clip.
Note: Instant timecode tip is a feature of Corel VideoStudio Pro
that allows you to add clips with a specific timecode. It appears
Trim markers
Mark-in/
Mark-out