
User guide
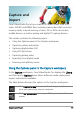

Capture and import 37
• Capture Video — Transfers video from your source to your hard
drive.
• Take a Snapshot — Captures the displayed video frame as a
photo.
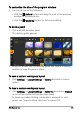
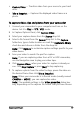
To capture video clips and photos from your camcorder
1 Connect your camcorder to your computer and turn on the
device. Set it to Play (or VTR / VCR) mode.
2 In Capture Options Panel, click Capture Video.
3 Select your capture device from the Source drop-list.
4 Select a file format from the Format drop-list. In the Capture
folder box, type a folder location or mark the Capture to library
check box and choose a folder from the drop-list.
Note: Click Options to customize capture settings specific to your
video device.
5 Scan your video to search the part for capture.
Note: If you are capturing video from a DV or HDV camcorder,
use the Navigation area to play your video tape.
6 Click Capture Video, when your video for capture is already on
cue. Click Stop Capture or press [Esc] to stop capturing.
7 To capture a photo from the video footage, pause the video on
the desired frame then click Take a Snapshot.
Note: When your camcorder is in Record mode (usually named
CAMERA or MOVIE), you can capture live video.
Note: The available settings in the Video properties dialog box
vary, depending on the capture file format that you have chosen.