
User guide

190 Corel VideoStudio Pro User Guide
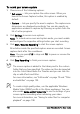
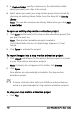
To record your screen capture
1 Choose one of the following options:
• Full screen — lets you capture the entire screen. When you
launch the Screen Capture toolbar, this option is enabled by
default.
• Custom — lets you specify the area to capture. The capture area
dimensions are displayed accordingly. You can also specify an
application window to capture by choosing an option from the
list of active programs.
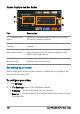
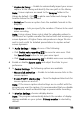
2 Click Settings to access more options.
Note: To include voice-overs and system audio, you must enable
and configure the respective settings before you start recording.
3 Click Start / Resume Recording to start the screen capture.
All activities inside the specified capture area are recorded. Screen
capture starts after the countdown.
Note: You can press F10 to stop and F11 to pause or resume the
screen capture.
4 Click Stop Recording to finish your screen capture.
The screen capture is added to the Library and to the custom
folder that you have specified. The video can then be imported
into the Corel VideoStudio Pro Timeline and you can trim the
clip or add effects and titles.
For more information, see “Edit media” on page 75 and “Titles
and subtitles” on page 105.
To create a high quality video, use the applicable Windows
Media Video (WMV) profile in the Share workspace. You can
also enable Same as First Video Clip to use the settings of your
screen capture recording when rendering your video.
For more information, see “Saving to video files for computer
playback” on page 198.