
User guide


8 Corel VideoStudio Pro User Guide
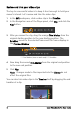
4 The music is added to the Music track, and as with other clips, you
can drag it to a new position in the Timeline and trim it by
dragging the end handles.
5 To fade the music at the end of your project, click the Fade-out
button in the Auto Music area.
Note that with any audio clips, or video clips that include sound, you
can control the volume of the clips. For more information about
adjusting audio, see “Audio” on page 161.
Save and share
When you’re finished with your project, you can save it and share it in
a variety of ways. For this tutorial, we’ll upload it directly to the Web.
Before sharing, it’s important to save a version of your project to the
native *.vsp format. This will give you maximum flexibility if you choose
to edit your project later or if you want to output it to a different
format.
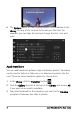
1 Click the Share tab to view the Share workspace.
2 Click File > Save, choose a location from the Save in box, and type
a name in the File name box.
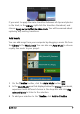
3 To share your video on the Web, click the Web button , then
click YouTube, Facebook, Flickr, or Vimeo, and click Log In to sign
in to your account or to create an account. After you sign in and
approve the link between Corel VideoStudio Pro and the account,
choose the settings you want for your video upload and click
Start.