
Operation Manual

Edit 61
2 In New clip duration, specify a set duration for your video clip.
Note: If you want to maintain the original duration of your clip, do
not change the original value.
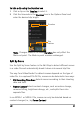
3 In Frame Frequency, specify the number of frames to be removed at
regular intervals during video playback.
Note: A higher value entered in Frame Frequency will produce a
more noticeable time-lapse effect on your video. Otherwise,
maintain the value at 0 to retain all frames in your video clip.
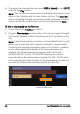
4 Drag the Speed slider according to your preferences (i.e., slow,
normal or fast), or enter a value.
Note: The higher the value you set, the faster the playback of your
clip. (Values range from 10-1000%).
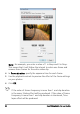
5 Click Preview to view the results of your settings.
6 Click OK.
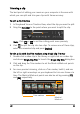
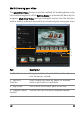
To apply Time-lapse/Strobe effects on your photos
1 Click File > Insert Media File to Timeline > Insert Photo for Time-
lapse/Strobe.
2 Browse for the photos you want to include in your project and click
Open.
Note: It is recommended to choose a series of photos taken in
succession from your DSLR.
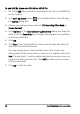
3 Specify the number of frames to be retained and removed in Keep
and Drop.