
Operation Manual

Capture 51
4 Select where you want you stop motion project to be stored by
choosing an existing Library folder from the drop-down menu in
Save to Library.
Note: You can also create a new Library folder when you click Add a
new folder.
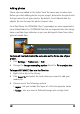
To capture images
1 Connect your capture device (webcam / DV/HDV camcorder) to your
computer.
If you are using a DV/HDV camcorder, switch it to Play/Edit mode
and make sure that your DV/HDV camcorder is switched to DV/HDV
mode.
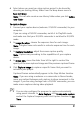
2 In Image Duration, choose the exposure time for each image.
Note: A higher frame rate results in a shorter exposure time for each
image.
3 In Capture Resolution, adjust the screen capture quality.
Note: Options vary according to the capabilities of your capture
device.
4 In Onion Skin, move the slider from left to right to control the
opacity of the new captured image and the previous captured frame.
5 Click Capture image to capture a specific frame that you want to
include in your project.
Captured frames automatically appear in the Stop Motion timeline.
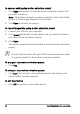
Note: If you are using a webcam or a camcorder in Record mode,
move your subject between each capture to show movement in the
images. If you are using footage from a DV/HDV camcorder, you can
make screen captures during video playback.
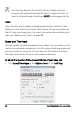
You can also configure the program to capture automatically
using preset intervals. In Auto Capture, click Enable auto capture
and set the Capture Frequency and Total Capture Duration in Set
Time.