
Operation Manual
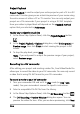


162 Corel VideoStudio Pro User Guide
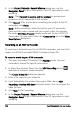
5 In the Project Playback - Record Window dialog box, use the
Navigation Panel to go to the section of the DV tape where to start
recording.
Note: Click Transmit to device unit for preview to preview your
project on the DV camcorder’s LCD monitor.
6 Click Record. After you are done recording your project to the DV
camcorder, click Finish.
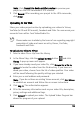
Note: Before recording a video file back to your DV camcorder,
make sure the video is saved with the correct codec. For example,
the codec DV Video Encoder usually works well for most NTSC DV
camcorders. You can select it from the Compression tab in the Video
Save Options dialog box.
Recording to an HDV camcorder
To record your finished project to an HDV/HD camcorder, you must first
render it as HDV/HD-encoded MPEG-2 transport stream file.
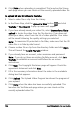
To record a movie to your HDV camcorder
1 Turn your camcorder ON and set it to Play/Edit mode. See your
camcorder's manual for specific instructions.
2 In Share Step Options Panel, click the HDV Recording button
and select a transport stream template.
The Create Video File dialog box appears.
3 Enter a file name for your video file.
4 Corel VideoStudio Pro renders the project. When done, HDV
Recording - Preview Window dialog box opens. You can preview the
video file here.
5 Click Next to start recording.
6 In the Project Playback - Record Window dialog box, use the
Navigation Panel to go to the section of the DV tape where to start
recording.