
Operation Manual

Edit 125
Adding voice-over narration
Documentaries, news and travel features often use narrations to help the
audience understand what is going on in the video. Corel VideoStudio
Pro allows you to record your own narration.
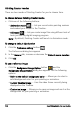
To add voice-over narration
1 Move the scrubber to the section of the video where you want to
insert your voice-over.
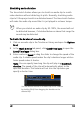
2 In Timeline view, click the Record/Capture Option button and
select Voice-over. The Adjust Volume dialog box appears.
Note: You cannot record over an existing clip. When a clip is
selected, recording is disabled. Make sure that a clip is not selected
by clicking on an empty area on the Timeline.
3 Speak into the microphone and check if the meter responds
accordingly. You can use the Windows audio mixer to adjust the level
of the microphone.
4 Click Start and begin speaking into the microphone.
5 Press [Esc] or [Space] to end recording.
Note: The best way to record narrations is to do the recording in 10
to 15-second sessions. This makes it easier to remove a badly
recorded narration and redo it. To remove, just select the clip on the
Timeline and press [Delete].
Adding background music
Corel VideoStudio Pro can record and convert sound tracks from your CD
into WAV files and then insert them onto the Timeline.
Corel VideoStudio Pro also supports WMA, AVI, and other popular audio
file formats which you can directly insert onto the Music Track.