
Operation Manual


Advanced Edit 19
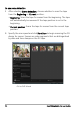
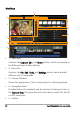
Contains buttons for switching between two project views, such as
Storyboard View and Timeline View, and for choosing other quick
settings.
• 6 - Project Timeline
Displays all the clips, titles, and effects that are used in your project.
• 7 - Library
Stores and organizes all of your media clips.
• 8 - Library Panel
Filters your library according to media type — Media, Transitions,
Title, Graphic, Filter, and Audio.
• 9 - Options Panel
Contains controls, buttons, and other information that you can use
to customize the settings of the selected clip. The contents of this
panel vary, depending on the nature of the media clip selected.
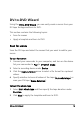
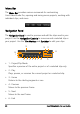
Step Panel
Corel VideoStudio Pro simplifies the process of creating movies into three
simple steps. Click the buttons in the Step Panel to switch between steps.
Media clips can be recorded or imported directly
to your computer's hard drive in the Capture Step.
This step allows you to capture and import video,
photo, and audio clips.
The Edit Step and the Timeline are the heart of
Corel VideoStudio Pro, where you can arrange,
edit, trim and add effects to your video clips.
The Share Step lets you export your finished movie
to tape, a DVD, or the Web.