
User Guide


Academic Courseware: Chapter 9
Joyce Ryan
80
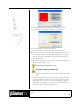
4 From the Script Selector, choose another script and play it back.
5 Click the Single Step button to see the steps the script is following.
Recording a script
As an animator, I am constantly making storyboards. I find it
convenient to have a script that will automatically create my storyboard
templates. In this exercise, we will script a typical video storyboard
panel.
Record a script
1 Start recording by clicking the Record button on the Scripts palette.
2 Open a new file with a white background. Set it to 720 x 486 at 180
ppi (that is a good resolution for printing on a 1440 dpi inkjet
printer).
3 Choose Select > All, or use Command+A (Mac OS) or Ctrl+A
(Windows). Choose Select > Convert To Shape.
4 From the Shapes > Set Shapes Attributes dialog box, make sure
Stroke is on and Fill is off. Select a color for your border and adjust
the size of the stroke.
5 Choose the Shape Selection tool in the toolbox. In the property bar,
click the Convert To Layer button, then drop the layer to the canvas.
6 Go to Canvas > Canvas Size, and add 200 pixels to the bottom of the
canvas.
7 Click on the Text tool in the toolbox, and type in “Audio,” “Job” and
“Scene #.”
8 Put a thin border around the entire image. Make sure everything is
dropped to the canvas, and stop recording. Give your script a
descriptive name like NTSC756X486.
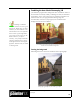
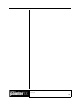
9 Close your image file and play back your script. If you have done
everything correctly, you should have an image similar to this:
Before recording a script, stop
and think about what it is you want
the script to do. Write down your steps,
then record.
A script is a tiny file
compared to a high-resolution image
file. Record a script for every type of
storyboard you might need. Move the
scripts to a library called Storyboards.
Load the library and run the
appropriate script whenever you need a
storyboard panel!