
User Guide


Academic Courseware: Chapter 7
Joyce Ryan
66
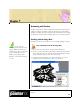
4 Paint your butterflies. Try using and making patterns for filling the
wings. I used a pattern to make textured fills on my wings. I
reproduced the pattern in different colors for different parts of the
wings.
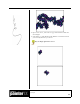
5 Hold down the Shift key and starting with Layer 1, click on each
layer on the Layers palette until all 8 layers of butterflies are selected.
Choose Layers > Group to group the butterflies.
6 In the toolbox, click the Nozzle Selector. Click the selector menu
arrow, and choose Make Nozzle From Group. Corel Painter will
create a file with all the positions of your butterfly. Save the file as
Butterflybrush.rif and close it.
7 In the Nozzle Selector, click the menu arrow, and choose Load
Nozzle. Open Butterflybrush.rif.
8 From the Brush Selector bar, select the Image Hose brush category
and try several variants. I chose the Linear-Size-P Angle-R variant.
Butterflies flit around somewhat erratically. This variant allows me to
change the size and angle of butterflies flight with the pressure I
exert, helping me to draw a more realistic flight pattern.
Try the sample butterfly brush (Buttrflybrush.rif).
Record a stroke
1 Open a new file, 320 x 240 at 72 ppi.
2 On the Brush Selector bar, click the menu arrow, and choose Record
Stroke. The next brush stroke you make is saved in memory.
3 Adjust the brush size and using your butterfly brush, draw a
continuous path across the canvas.
To save time switching fills
and colors, paint with one color or fill
at a time on each layer. Shut off all the
layers but the one you are painting on.
Fill with one color or pattern. Shut off
the layer and click on the next layer to
fill, turn it on and paint. Continue
until you are finished painting each
layer with that one color and fill.
Make a separate file of the
full color painting as a reference to
paint and sample color from. This is
especially useful if more than one
person is doing the coloring.