
User Guide


Academic Courseware: Chapter 3
Joyce Ryan
37
4 Move to the next frame and turn on the next inbetween, turning off
everything else.
5 Repeat until you have an inbetween on each frame of your movie—
your layers have become frames.
6 Shut off all your layers.
7 Play back the movie to test your motion.
8 If your computer plays back too quickly, save your movie as an AVI at
a frame rate of 12 to 15 frames per second and view the AVI, or save
it as sequential TARGA® files to edit in a video editing program.
You can also slow the playback down by repeating the above process,
but instead of forwarding one frame, try forwarding two or three
frames for each drawing.
Pencil tests show you if you have enough inbetweens for fluid motion
from one pose to another. There are two ways to change the timing of
your animation: Adding more inbetweens will slow things down and
make the motion more fluid; holding each drawing for a longer period of
time will slow things down as well, but your motion will be choppier.
In video, you work with 30 frames per second. If you have 15 drawings
to describe that second, you hold each drawing for two frames. This is
referred to as shooting on “twos.” If you have a different drawing for
each frame, or 30 drawings per second, it is called shooting on “ones.”
Getting a feel for timing is a major part of becoming an accomplished
animator. Some motion looks better on twos, some on ones, some on
threes or more. There is a great deal of animation produced for the Web
and television that is designed with far longer holds than twos and that
still works quite well for the style of animation.
Tweening
Inbetweening is drawn by hand and takes drawing skill and practice.
“Tweening” can be done by a software program and can be a tremendous
labor-saving device. Learn how to use inbetweening and tweening to
their best advantage.
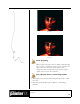
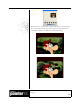
Practice tweening with Corel Painter
1 Open a new movie file at 320 x 240 pixels and 72 ppi, set for 30
frames.
2 Open another file, the same size but a single image.
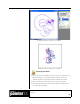
3 Choose the Image Hose brush category. Open the Nozzle Selector in
the toolbox, click the selector menu arrow, and choose Load Nozzle.
Locate the Walkbrush.rif file, and click Open.