
User Manual

86 Corel VideoStudio
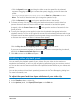
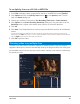
To replace a clip
1 In the Timeline, right-click the media clips you want to replace.
2 Choose Replace clip from the right-click menu.
The Replace/relink clip dialog box appears.
3 Browse for the replacement media clips and click Open.
The clip in the Timeline is automatically replaced.
The duration of the replacement clip must be equal to or longer than the duration of
the original clip.
Hold [Shift] and click multiple clips to select two or more clips in the Timeline and
repeat the process for replacing multiple clips. The number of replacement clips must
match the number of clips that you selected in the Timeline.
You can also drag a video clip from the Library to the Timeline and hold the [Ctrl] key
to automatically snap on a clip to be replaced.
Trimming a clip
The best part of editing your movie on your computer is the ease with which you can split
and trim your clips with frame accuracy.
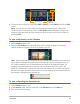
To split a clip into two
1 In Storyboard View or Timeline View, select the clip you want to split.
2 Drag the Scrubber to the point where you want to split the clip.
Note: Click or to set the cutting point more precisely.
3 Click to split the clip into two clips. To remove one of these clips, select the unwanted
clip and press [Delete].
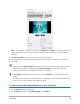
To trim a clip with the Trim markers using Single Clip Trimmer
1 In the Library, right-click on a video clip and choose Single Clip Trim to launch the
Single Clip Trim dialog box.
2 Click and drag the Trim markers to set the Mark-in/Mark-out points on the clip.
3 For more precise trimming, click on a Trim marker, hold it, and use the left or right arrow
keys on your keyboard to trim one frame at a time. The Mark-in/Mark-out points can
also be set by pressing [F3] and [F4], respectively.