
User Manual


Burn discs 225
To add a title menu
• Click Advanced Settings in the Edit tab and select Add Title Menu.
To add chapter menus
• Click Advanced Settings in the Edit tab and select Create Chapter Menu.
To show the menu thumbnail numbers
• Click Advanced Settings in the Edit tab and select Show Thumbnail Number.
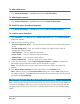
To create a menu template:
1 Click Customize in the Edit tab of the 2 Menu & Preview page. The Customize Menu
dialog box appears.
2 Choose from the following options:
• Set the background music — Lets you choose an audio file to be used as background
music.
• Set the background — Lets you choose an image or a video file to be used as
background image or video.
• Font Settings — Lets you apply text attributes.
• Pan & Zoom — Lets you apply pan and zoom effects.
• Motion Filter — Lets you apply motion effects.
• Menu In/Menu Out — Lets you apply menu motion effects.
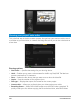
3 In the drop down menu, select Frame, Navigation Button, or Layout to display the
associated preset thumbnails. Double-click a thumbnail to apply it.
Note: You can also resize, distort, rotate, and move menu objects in the Preview
Window.
4 Click Add to Menu Template to add the template to the Favorites folder.
Note: When working in the Customize Menu dialog box, use the Font dialog box to
accurately resize text. The Font dialog box can also be launched by right-clicking the text
and selecting Font Attributes.
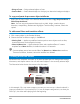
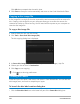
Previewing your movie and menu before burning
Now, it's time to see how your movie looks before you burn it onto a disc. Simply move the
mouse and click Play to watch your movie and test the menu on your computer. Use the
navigation controls here as you would on a standard remote control of a standalone disc
player.