
User Manual


Burn discs 223
To align a single menu object
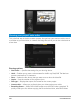
• Click the menu object in the Preview Window and drag it to the desired position.
To use the grid lines as reference when dragging the menu objects, right-click the
Preview Window and select Show Grid Line. To automatically align your object to the
nearest grid line as you drag it, select Snap to Grid Line.
Make sure that the objects are within the TV safe area (defined by a border with dotted
lines).
To align multiple menu objects
1 Select the objects in the Preview Window by pressing [Ctrl].
2 Right-click, select Align, and choose from the following options:
• Left/Top/Right/Bottom — Moves all selected objects (except model object)
horizontally to align left/top/right/bottom side with the left/top/right/bottom side of
model object.
• Center Vertically — Moves all selected objects vertically to the center of top/
bottommost objects.
• Center Horizontally — Moves all selected objects horizontally to the center of left/
rightmost objects.
• Center Both — Moves all selected objects to the center of top/bottom/left/rightmost
objects.
• Space Evenly Vertically — Moves all selected objects (except top/bottom most
objects) vertically to even vertical space. This menu item is only available when more
than three objects are selected.
• Space Evenly Horizontally — Moves all selected objects (except left/right most
objects) horizontally to even horizontal space. This menu item is only available when
more than three objects are selected.
• Equal Width/Height — Resizes all selected objects (except model object) to the same
width/height as model object.
• Equal Width and Height — Resizes all selected objects (except model object) to the
same width and height as model object.
To arrange the Z-order of menu objects
• Right-click the menu object in the Preview Window, select Align, and choose from the
following alignment options:
• Bring Forward — Brings selected object one layer forward.
• Send Backward — Sends selected object one layer backward.