
User Manual


Burn discs 219
To save a disc output project
1 On the disc output window, click the Close button.
The Save As window opens.
2 In the File name box, type a file name.
3 In the Save in drop-list, select a file location.
4 In the Save as type drop-list, select a file format.
You can select a file format that is compatible with earlier versions of VideoStudio.
5 Click Save.
Note: A check mark on the disc format button indicates that the disc project has
been saved. Click the previously selected disc format button to continue the disc output
process. You can also edit the disc project at a later time. Click File > Open Project and
select your saved VideoStudio Pro project file (*.vsp).
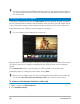
Assembling files
You can import videos or VideoStudio Pro project files (*.vsp) that you want to include in
your final movie.
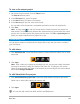
To add videos
1 Click Add video files. Locate the folder where the videos are stored. Select one or more
video clips.
2 Click Open.
Note: After a video clip is added to the Media Clip List, you may see a black thumbnail
that may be caused by a black first frame of the video clip. To change it, click on the
video clip and move the Jog Slider to the scene that you want. Right-click the thumbnail
and choose Change Thumbnail.
To add VideoStudio Pro projects
1 Click Add VideoStudio project files. Locate the folder where the projects are stored.
Select one or more video projects you want to add.
2 Click Open.
You can also add videos from DVD, AVCHD, and BDMV discs.