
User Manual


Save and share 215
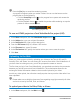
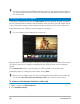
Creating video files from part of a project (trimmed)
For any of the sharing categories, you can create a video from part of your project, rather
than the full project, by using the Trim Markers below the Preview window and enabling the
Create Preview Range Only check box.
For more information about using the Player panel, see “Using the Player panel” on page 25.
To create a video file from a trimmed range
1 In the Share workspace, click a sharing category, click an output option, and choose your
settings.
2 Ensure that the Create Preview Range Only check box is marked.
3 In the Player panel, click Project.
4 Select a range by dragging the orange Trim Markers to the start and end points you
want.
Only the area between the orange Trim Markers is rendered
5 In the bottom-right corner of the Share workspace, click Start.
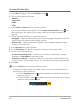
Creating sound files
Corel VideoStudio lets you create a sound file from an existing video file. This is especially
useful when you want to use the same soundtrack with another set of images, or when you
want to convert the audio from a live performance into sound files. Corel VideoStudio makes
it easy for you to create an audio file of your project in M4A, OGG, WAV or WMA formats.
To create an audio file
1 In the Share workspace, click the Computer button , and click Audio.
2 From the Format drop-list, select an audio file format.
If you want to adjust the settings for the format, click the Options button and adjust
any of the settings on the Profile or Attributes pages.
3 In the File name box, type a file name.
4 In the File location box, specify the location where you want to save the file.
5 Set any of the following options:
• Create Preview Range Only — renders only the section of video that is selected
between the Trim Markers in the Player panel.