
User Manual


Save and share 209
• Create Preview Range Only — renders only the section of video that is selected
between the Trim Markers in the Preview panel.
• Enable Smart Render — analyzes a video for any previously rendered sections and
renders only the new or revised sections. This can reduce rendering time significantly.
7 Click Start.
Press the [Esc] key to cancel the rendering process.
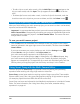
A progress bar appears when you render a video. You can use the buttons on the
progress bar to do the following:
•Click the Pause/Play button on the progress bar to pause and resume the
rendering process.
• Click the playback button to enable the preview while rendering or stop the
preview to reduce rendering time.
The rendering progress bar
Saving to video files for mobile devices
You can save your movie project to file formats that you can playback on a variety of mobile
devices, such as smartphones, tablets, and game consoles. Corel VideoStudio includes a
range of profiles that optimize your video for specific devices.
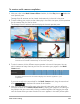
To create a video file for a portable device or camcorder
1 In the Share workspace, click the Device button .
2 Click one of the following buttons to view and choose the profile for your video:
• DV — Convert the project to a DV-compatible video file that can be written back to a
DV camcorder. Connect your camcorder to the computer, turn your camcorder on, and
set it to Play/Edit mode. See your camcorder's manual for specific instructions.
• HDV — Convert the project to an HDV-compatible video file that can be written back
to an HDV camcorder. Connect your camcorder to the computer, turn your camcorder
on, and set it to Play/Edit mode. See your camcorder's manual for specific instructions.
• Mobile Device — Creates a high-definition MPEG-4 AVC file that is compatible with
most tablets and smartphones, including iPad, iPhone, and Android devices.
• Game Console — Create MPEG-4 AVC video files that are compatible with PSP devices.
3 In the Profile drop-list, choose an option.
4 In the File name box, type a file name.
5 In the File location box, specify the location where you want to save the file.
6 Set any of the following options: