
User Manual


Multi-Camera editing 201
audio for each of the clips and sync the clips automatically. If your recordings are planned,
you can use a special audio signal, such as clapping your hands (similar function to using a
clapper board in professional shoots). Some events have natural audio cues that help the
sync process, such as music performances or sporting events with a start signal.
You can also synchronize the clips by using markers, shooting time, or you can adjust them
manually by dragging the clips in the timeline to the timecode you want. For example, you
could use a common visual element, such as a flash to sync videos manually. These methods
are helpful if your video footage doesn’t include audio or the audio waveforms within the
clips are difficult to sync, or you simply prefer to align the clips manually.
In some cases you might need to use a combination of the synchronization options,
depending on your source footage.
To synchronize video and audio clips in the Multi-Camera Editor
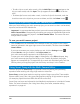
1 After importing your clips to the Multi-Camera Editor, choose one of the following
options from the Source Sync Type drop-list on the toolbar:
• Audio — Click the Sync button next to the drop-list to synchronize the clips in the
timeline. Note: Your video clips must include audio to use this option.
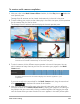
• Marker — Select a clip in the timeline, play the clip or scrub to the position you want
by using a visual cue, and click the Set/Remove Marker button on the toolbar to
add a marker. After a marker has been added to each clip, click the Sync button on
the toolbar to align the clips according to the markers.
• Shooting Date/Time — Click the Sync button to synchronize the clips according
the shooting date and time as indicated by the metadata recorded by the camera.
Note: The clocks must be in sync on the cameras to get accurate results.
• Manual — In the timeline, drag each clip to the position you want by using a visual
cue.
Note: If there are clips that you want to exclude from the synchronization process, click
the Exclude from Synchronization button on the corresponding track. Click the
button again (Enable for Synchronization ) to include the track.
Tip: After you synchronize your clips, you can use the Lock buttons on the
individual tracks to ensure that the tracks stay synchronized during the editing process.
Choosing an audio source for your multi-camera project
After you import and synchronize your clips in the Multi-Camera Editor, you can make some
decisions about the audio for your project. For example, if you have four video clips, and they