
User Manual


Multi-Camera editing 199
Transition and Duration — Lets you apply a transition between clips in the
Multi-Camera track and set the duration for the transition. For more information, see “To add
a transition between multi-camera segments” on page 204.
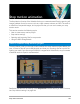
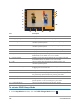
The main preview pane includes the following controls:
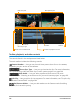
Rotate Left and Rotate Right — Let you rotate clips in the Camera tracks before you
add them to your Multi-Camera track or your PIP track. Note: Only unlocked tracks can be
rotated.
Playback bar with Home, Previous Frame, Play, Next Frame, and End
buttons.
Loop — Lets you play the selected track continuously by looping back to the start when
it reaches the end.
Set Volume — Lets you adjust the audio volume for playback.
Timecode control — Lets you view and set the time/frame that appears in the
main preview pane and where the scrubber is set in the timeline. Click the arrows or a click
number value to set a time/frame.
The timeline includes the following controls:
Source Manager — Lets you add and remove clips. For more information, see
“Managing multi-camera source files” on page 205.
Show/Hide Audio Waveform View — Lets you view the audio waves for Camera and
Audio tracks.
Lock/Unlock — Appears on individual tracks. Locking tracks is recommended after
you synchronize them.
Include/Exclude from Synchronization — Lets you determine which tracks are
included in the synchronization process.
Mute/Unmute — Lets you turn the audio off (mute) or on (unmute) for the selected
audio track.
Zoom to Timeline — Located in the lower left corner of the timeline, this control lets you
expand or compress your project so you can view the whole project in the timeline.
Zoom Level slider — Drag the slider or click the Zoom in (plus sign) or
Zoom out (minus sign) to change the zoom level for your project. This is particularly helpful
when editing individual segments in the Multi-Camera track.
The following general controls appear in the upper-left corner of the application window:
Settings — Lets you access the Proxy Manager and Save As. For more information, see
“Using Smart Proxy with the Multi-Camera Editor” on page 206 and “To save your multi-
camera project” on page 206.