
User Manual


194 Corel VideoStudio
To create a stop motion project
1 If using an external camera to capture your stop motion project, ensure that the camera
is plugged into your computer and is on, ready to capture photos. Set the camera to
manual mode.
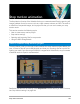
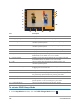
2 In VideoStudio, open the Stop Motion window by doing one of the following:
• In the Edit workspace, click the Record/Capture button on the Timeline toolbar,
and click the Stop Motion button .
• In the Capture workspace, click Stop Motion.
3 Click the Create button, and from the drop-list in the upper-right corner of the window,
choose the camera you want to use as your capture device (displays supported cameras
that are connected to the computer and switched on).
4 Do one of the following:
• On your camera, manually choose the best settings for your stop motion scene and
adjust the focus (can set the lens to MF to focus manually).
• If you have a compatible camera (many Canon and Nikon DSLRs are supported), click
the DSLR settings tab and choose the settings for your camera. You can then focus the
camera manually or set the lens to AF mode, and in VideoStudio, enable Show Focus
to display the onscreen controls. Click Auto Focus or Manual Focus. For Auto Focus,
drag the rectangle to the area of focus. The camera will automatically adjust the focus.
5 Type your Project Name, and choose a Capture Folder and a Save to Library location.
6 When you know what kind of motion you want to make, click the Stop motion settings
tab, and choose the settings you want.
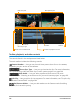
7 When you have the subject set up, click the Capture Image button. If you are using Auto
Capture, this will initiate the capture intervals you set.
8 Move your subject the way you want, and continue capturing an image for each
movement. Each capture displays in the thumbnail tray at the bottom of the window.
9 When you are ready to review the frames, click the Play button below the preview to
review the movie. In the thumbnail tray, select any of the thumbnails and right-click to
copy or delete a thumbnail.
10 When you are finished, click the Save button at the bottom of the window to return to
the main application window.
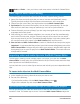
Stop motion settings
The following settings are available in the Stop Motion window:
• Image Duration — Lets you choose the exposure time for each image. A higher frame
rate results in a shorter exposure time for each image.
• Capture Resolution — Lets you adjust the screen capture quality. Options vary
according to the settings on your capture device.