
User Manual

Motion tracking 169
Note: Key frame nodes are automatically added every time you move to another frame
and make a modification. You can also create a key frame node by dragging the
scrubber and clicking the Add key frame button .
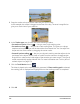
3 Adjust the properties of your title depending on the requirements of your project.
Each time you set a value, a key frame is added.
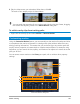
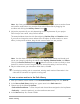
The example below shows the title after adjusting Position, Size and Rotation values.
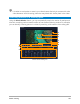
If you want to change the center reference for the object (to offset rotation or zoom
effect), in the preview window, drag the red centre marker to a new position
Note: You also have the option to change the opacity, add a shadow and border, and
mirror your image by adjusting the values under Opacity, Shadow, Border, and Mirror.
Clicking the Ease in/Ease out button / allows the motion to start out slowly or slow
down as it comes to an end. Drag the slider to control the easing in and out timing.
4 Play the video to test your animation. When done, click OK.
If an existing tracking path is customized, existing match motion information in the
video will be converted to a generic moving path.
To save a custom motion to the Path Library
1 After you create a custom motion in the Customize Motion dialog box, click Save to.
2 In the Save to Path Library dialog box, type a name in the Path name box.
3 Choose one of the following Options:
• Path with all attributes — saves the path and the attributes assigned to the keyframes
• Path only — saves the path only; no other attributes are saved
4 In the Save to drop-list, choose a folder.