
User Manual

156 Corel VideoStudio
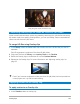
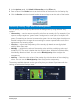
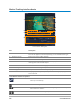
You can use Chroma Key to replace the background behind subjects captured against
a green screen.
To blend an overlay clip with the background by using Key settings
1 In the Timeline, select an overlay clip.
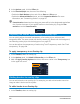
2 In the Options panel, click Mask & Chroma Key on the Effect tab.
3 Enable the Apply Overlay Options check box, then choose one of the following settings
from the Type drop-list:
• Chroma Key
• Gray Key
• Multiply
• Add Key
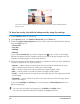
If you choose Chroma Key, use the eye dropper tool to pick a color in the Preview
Window and adjust the color similarity value (to the right of the eye dropper tool). The
transparency effect appears in the Preview Window.
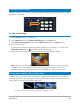
4 Experiment with any of the following settings to achieve the results you want (availability
of controls depends on the Type you select):
• Gamma — affects image contrast and can be used to lighten (move control to the
right) or darken (move control to the left) the overall image
• Min — can be moved to the right to darken the image’s lightest pixels
• Max — can be moved to the left to lighten the image’s darkest pixels
• Cutoff — can be moved to the right to set a new black point for the image (more black
in the image).
• Threshold — can be moved to the left to set a new white point for the image (more
white in the image).
If you choose Multiply or Add Key, you can also adjust the Blend/Opacity setting to
adjust transparency.
You can crop an overlay clip by adjusting the Width and Height values.
You can invert the blend settings by enabling the Invert check box.