
User Manual

Video filters 149
Customizing filters
Corel VideoStudio allows you to customize video filters in a variety of ways, such as by
adding key frames to your clips. Key frames let you specify a different attribute or behavior
for your video filter. This gives you the flexibility to determine how your video filter will look
at any point in a clip and to vary the intensity of an effect over time.
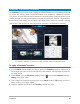
To set key frames for your clips
1 Drag and drop a video filter from the Library onto a clip on the Timeline.
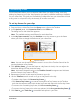
2 In the Options panel, click Customize Filter on the Effect tab.
The dialog box for the video filter appears.
Note: The available settings are different for each video filter.
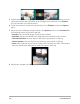
3 In the Key frame controls, drag the Scrubber or use the arrows to go to the frame
where you'd like to change the attributes of your video filter.
Note: You can use the mouse wheel to zoom in or out of the Timeline Control bar for
precise placement of key frames.
4 Click Add key frame to set that frame as a key frame in the clip. You can adjust the
video filter settings for that particular frame.
Note: A diamond-shaped mark on the Timeline Control bar appears and indicates
that the frame is a key frame in the clip.
5 Repeat steps 3 and 4 to add more key frames to your clip.
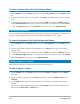
6 Use the Timeline controls to edit or to go to a key frame in the clip.
• To delete a key frame, click Remove key frame .
• Click Reverse key frames to reverse the sequence of key frames on the Timeline
such that the sequence starts with the last key frame and ends with the first key frame.
• To move to the succeeding key frame, click Go to next key frame .
• To move to the key frame prior to the one selected, click Go to previous key frame .
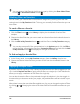
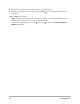
7 Click Fade In and Fade Out to establish fade points in your filter.
Key frame Controls