
User Manual


140 Corel VideoStudio
You can set reference points to customize Morph Transition results.
To add a Morph Transition
1 In the Library, click the Transition category button , choose Slide from the Gallery
drop-down menu or in the Search box, type Morph.
2 Drag the Morph Transition thumbnail to the Timeline, between two clips.
3 Preview the results in the Player panel. To adjust the duration of the transition or to set
where the transition starts and ends, drag the edges of the transition in the Timeline.
You can stop here if you like the results.
4 If you want to edit the transition, double-click the transition in the Timeline to open the
Options panel, and click Customize.
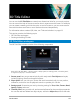
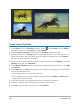
5 In the Morph Transition window, compare the orange transition guide lines in the Start
and End area.
6 In the Start area and End area, drag to set the nodes for the orange guide line that will
be used as a reference point.
• You can add nodes by clicking the guide line.
• You can delete nodes by right-clicking a node and choosing Delete or Delete All (for
all but the first and last node).
7 In the Preview area, use the playback controls to preview the transition.
8 If required, adjust the guide lines to fine tune the transformation.
9 Click OK to exit the editor and to return to the Timeline.