
User Manual


Quick start 5
Apply transitions
You can add transitions between clips or between photos. Transitions can be used to fade in
or fade out or to dissolve one photo into the next. There are many transition options to
choose from.
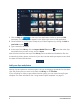
1 In the Library, click the Transition button .
2 Click the Gallery drop-list at the top of the Library, and choose All if you want to see
what is available.
3 Drag the thumbnail for the transition you want to the Timeline and place it between two
clips or photos.
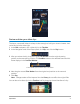
If you want to apply the same transition between all clips and photos in the track, in the
Library, right-click the transition thumbnail, and choose Apply current effect to video
track. You will be warned about replacing any existing transitions.
Add music
You can add songs from your computer by dragging a music file from the Library to the
Music track. You can also use Auto Music to choose royalty-free music to your project.
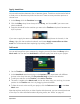
1 On the Timeline toolbar, click the Auto Music button .
1 In the Auto Music area that displays in the Options panel, experiment with different
choices in the drop-lists and click Play selected Song to listen to the selection.
2 To add your selection to the Timeline, click Add to Timeline.
3 The music is added to the Music track, and as with other clips, you can drag it to a new
position in the Timeline and trim it by dragging the end handles.
4 To fade the music at the end of your project, click the Fade-out button in the Auto
Music area.
Note that with any audio clips, or video clips that include sound, you can control the volume
of the clips. For more information about adjusting audio, see “Audio” on page 113.