
User Manual


132 Corel VideoStudio
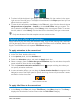
2 Drag the filter thumbnail from the Library onto your clip in the Timeline.
Note: By default, the filter applied to a clip is always replaced with the new filter
dragged onto the clip. In the Effect tab of the Options Panel, clear Replace last filter to
apply multiple filters to a single title.
3 To customize the title filter, in the Options panel, click the Effect tab, and do one of the
following:
• Click a thumbnail in the drop-list to the left of Customize Filter.
• Click Customize Filter. Available options depend on the selected filter.
Note: When there is more than one title filter applied to a clip, you can change the
order of filters by clicking the Move filter up arrow or Move filter down arrow
that appear to the right of the filter list on the Attributes tab. Changing the order of the
title filters will have different effects on your clip.
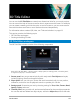
Converting titles to image and animation files
You can convert a frame in a title clip to an image file (PNG) or you can convert title clips
with moving elements to animation files (UISX). The PNG and UISX file are saved as Alpha
channel files. Why convert titles? You can add converted titles to overlay tracks, extending
the creative options and attributes that you can use. For more information, see “Overlay
clips” on page 151.
Ensure that the text in your title is final before converting—converted text cannot be
edited.
To convert a title to an image (PNG)
1 In the Timeline, click a clip in the Title track.
2 Scrub to the frame that you want to capture as an image.
3 Right-click the clip and choose Convert this frame to PNG.
The PNG file is added to the Library (Photos category).
To convert a moving title to an animated file (UISX)
1 In the Timeline, click a Title track clip that includes moving elements.
2 Right-click the clip and choose Convert to animation.
The UISX file is added to the Library (Videos category).