
User Manual

Audio 121
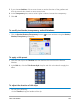
4 In the Edit Profile Options dialog box, click the Compression tab.
5 In the Audio format drop-list, choose Dolby Digital Audio.
6 In the Audio Settings area, choose 3/2 (L, C, R, SL, SR) from the Audio Type drop-list
box.
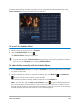
7 Click the Sound Mixer button in the toolbar.
8 Click the music note symbol in the center of the Surround Sound Mixer. Drag it to any of
the six channels depending on your sound position preference. Repeat steps 1 and 2 in
using stereo mode.
9 Drag the Volume, Center and Sub-woofer sliders to adjust sound controls of your audio
Note: You can also adjust the sound position preference of your tracks in Video,
Overlay and Voice. To do this, click your preferred track button and repeat steps 2 to 3.
Duplicating an audio channel
Audio files sometimes separate the vocal sound from the background audio and put them
in different channels. Duplicating an audio channel allows you to mute the other channel.
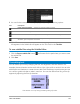
To duplicate an audio channel, click the Sound Mixer button in the toolbar. Click the
Attribute tab and select Duplicate audio channel. Choose which audio channel to duplicate
this may be Left or Right.
In recording voice-overs using the microphone, it will be recorded on one channel only.
You can improve the audio volume by using this feature to duplicate across channels.
Applying audio filters
Corel VideoStudio allows you to apply filters to your audio clips in the Music and Voice
Tracks. You can also apply audio filters to video clips that include audio.
To apply audio filters
1 In the Library, click the Filter button to display the filters.
2 Click the Show Audio Filters button to display only the audio filters.
3 Drag the audio filter to the Timeline and drop it onto an audio clip or a video clip that
includes audio.