
User Manual


2 Corel VideoStudio
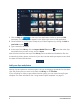
1 Click the Edit tab at the top of the application window to open the Edit
workspace. The Library panel appears in the upper right corner of the application.
2 Create a folder for your project to keep all your videos together by clicking the Add a
new folder button .
3 Type a name for the folder.
4 At the top of the Library, click the Import Media Files button , select the video clips
and photos that you want to use, and click Open.
Note that the buttons at the top of the Library can be enabled and disabled to filter the
thumbnails by video, photos, and music. If you don’t see the media you expect to see, check
the state of these media buttons.
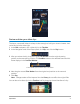
Add your clips and photos
Adding clips and photos to a video project is as easy as dragging thumbnails for the video
clips and photos that you want to use from the Library to the Timeline.
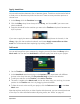
If you’re looking for a way to get polished results quickly, you can use an Instant Project
template. For more information, see “Using Instant Project templates” on page 51.