
User Manual

98 Corel VideoStudio
• Ease in: Starts slower and gradually brings the pan and zoom effect up to full video
speed.
• Grid lines: Displays a grid that helps you align the marquee.
• Grid size: Specifies grid line spacing according to the number of divisions you set.
• Snap to grid: Aligns marquee to closest grid line automatically.
• Background color: Specifies the color of the background if marquee extends beyond
the boundary of the media.
• Vertical: Specifies the y-axis position (top to bottom).
• Horizontal: Specifies the x-axis position (left to right).
• Rotation: Specifies the angle of the marquee in degrees.
• Zoom ratio: Specifies the zoom level by adjusting the size of the marquee.
• Transparency: Specifies the opacity of the photo or video at the selected key frame.
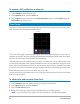
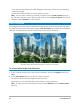
To set a constant zoom level for a photo or video
1 In the Timeline, select a photo or video clip and click the Pan and Zoom button on
the Timeline toolbar.
The Pan and Zoom window opens.
2 In the Edit Mode drop-down, choose Static.
3 In the Preset Size drop-down, choose a preset (such as HD if you’re zooming in on a 4K
video), or in the Original pane of the preview window, use the marquee to set the zoom
area and position.
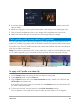
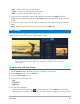
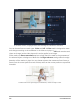
To apply a pan and zoom effect to a video while it plays
1 In the Timeline, select a video clip and click the Pan and Zoom button on the
Timeline toolbar.
The Pan and Zoom window opens.
2 In the Edit Mode drop-down, choose On the Fly.
3 In the Original pane (on the upper left side of the window), adjust the starting size and
position of the marquee. The result displays in the Preview pane on the right.
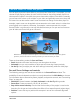
4 Click the Play button.
5 As the video plays, reposition and resize the marquee as you want. Key frames are added
automatically for each change you make.
6 Fine tune the results by using the key frames and adjusting the settings.
7 Click OK to return to the Edit workspace.