
User Manual

90 Corel VideoStudio
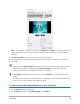
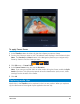
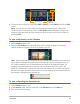
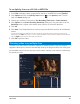
To trim a video file into multiple clips
1 In the Timeline of the Edit workspace, select the clip that you want to trim.
2 Double click the clip to open the Options panel.
3 Click Multi-Trim Video.
4 View the whole clip first by clicking Play to determine how you want to mark segments
in the Multi-Trim Video dialog box.
5 Choose the number of frames to display by dragging the Timeline zoom. You can
choose to display the smallest subdivision of one frame per second.
6 Drag the Scrubber until you get to the part of the video that you want to use as the
beginning frame of the first segment. Click Set Mark-in button .
7 Drag the Scrubber again, this time, to the point where you want the segment to end.
Click Set Mark-out button .
8 Do steps 4 and 5 repeatedly until you have marked all the segments you want keep or
remove.
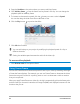
Note: To mark segments in and out, you can press [F3] and [F4] while playing the video.
You can also click the Invert Selection button or press [Alt+I] to toggle between
marking segments that you want to retain or marking segments that you want taken out
from the clip.
Quick search interval allows you to set a fixed interval between frames and browse
through the movie using the set value.
9 Click OK when finished. The video segments that you kept are then inserted onto the
Timeline.
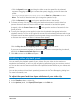
Part Description
1 — Timeline zoom Drag up and down to sub-divide a video clip into frames per second.
2 — AccuCut Timeline Scan a video clip frame by frame for accurate mark-in and mark-out
positions.
3 — Playback Speed Control Preview the clip at different playback speeds.
4 — Jog Wheel Use to scroll to different parts of the clip.
Navigation controls in the Multi-trim Video dialog box
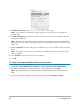
Reverses or advances through the video in fixed increments. By default, these
buttons move up or down through the video in increments of 15 seconds.
Plays a preview of the final trimmed video.
Plays the video file. Hold [Shift] then click to play only the selected segments.