
Operation Manual


Table Of Contents
- Contents
- Getting started
- Installing CorelDRAW Technical Suite X7
- Corel memberships and services
- What’s new in Corel DESIGNER X7?
- Learning resources
- Corel DESIGNER workspace tour
- Starting and setting up
- Corel DESIGNER basics
- Understanding vector graphics and bitmaps
- Starting and opening drawings
- Scanning images
- Working with multiple drawings
- Undoing, redoing, and repeating actions
- Zooming, panning, and scrolling
- Previewing drawings
- Choosing viewing modes
- Working with views
- Saving drawings
- Working with locked files
- Backing up and recovering files
- Adding and accessing drawing information
- Closing drawings
- Finding and managing content
- Working with precision
- Collaborating
- Lines, shapes, and outlines
- Working with lines, outlines, and brushstrokes
- Setting the default property values
- Drawing lines
- Parallel drawing
- Closing multiple line segments
- Drawing callouts
- Drawing connector lines
- Drawing dimension lines
- Formatting lines and outlines
- Adding arrowheads to lines and curves
- Drawing calligraphic, pressure-sensitive, and preset lines
- Applying linear-pattern brushstrokes
- Spraying linear patterns along a line
- Using pressure-sensitive pens and devices
- Support for Real-Time Stylus (RTS) pen tablets and devices
- Drawing shapes
- Shaping objects
- Working with curve objects
- Shaping curve objects by using Reflect Nodes mode
- Cropping, splitting, and erasing objects
- Splitting objects
- Trimming objects
- Filleting, scalloping, and chamfering corners of curve objects
- Welding and intersecting objects
- Creating new objects from boundaries
- Creating PowerClip objects
- Smudging and smearing objects
- Adding twirl effects
- Roughening objects
- Shaping objects by attracting or pushing away nodes
- Applying distortion effects
- Shaping objects by using envelopes
- Reference: Shaping objects
- Projecting objects
- Working with lines, outlines, and brushstrokes
- Objects, symbols, and layers
- Working with objects
- Selecting objects
- Changing object properties
- Copying, duplicating, and deleting objects
- Copying object properties, transformations, and effects
- Cloning objects
- Moving objects
- Sizing and scaling objects
- Rotating objects
- Mirroring objects
- Skewing objects
- Aligning and distributing objects
- Applying object hinting
- Changing the order of objects
- Grouping objects
- Combining objects
- Locking objects
- Finding and replacing objects
- Hiding and displaying objects
- Accessing and displaying geometric information about objects
- Inserting bar codes
- Inserting and editing QR codes
- Working with symbols
- Creating objects for the web
- Working with layers
- Object linking and embedding
- Working with object data
- Working with objects
- Color and fills
- Working with color
- Filling objects
- Managing and sharing fills and transparencies
- Using color management
- Understanding color management
- Getting started with color management in Corel DESIGNER
- Installing, loading, and embedding color profiles
- Assigning color profiles
- Converting colors to other color profiles
- Choosing color-conversion settings
- Soft proofing
- Working with color management presets
- Working with color management policies
- Managing colors when opening documents
- Managing colors when importing and pasting files
- Managing colors for print
- Using a safe CMYK workflow
- Managing colors for online viewing
- Special effects
- Text
- Adding and manipulating text
- Importing and pasting text
- Adding artistic text
- Adding paragraph text
- Adding columns to text frames
- Combining and linking paragraph text frames
- Aligning text by using the baseline grid
- Selecting text
- Finding, editing, and converting text
- Shifting, rotating, mirroring, and flipping text
- Moving text
- Wrapping text
- Fitting text to a path
- Inserting special characters, symbols, and glyphs
- Embedding graphics
- Working with legacy text
- Formatting text
- Choosing typefaces and fonts
- Formatting characters
- Changing text color
- Kerning a range of characters
- Changing text case
- Working with OpenType features
- Adjusting character and word spacing
- Adjusting line and paragraph spacing
- Adding bullets to text
- Inserting drop caps
- Changing character position and angle
- Aligning text
- Adding tabs and indents
- Working with text styles
- Hyphenating text
- Inserting formatting codes
- Displaying nonprinting characters
- Adding equations
- Working with text in different languages
- Managing fonts
- Using writing tools
- Adding and manipulating text
- Templates and styles
- Working with templates
- Working with styles and style sets
- Creating styles and style sets
- Applying styles and style sets
- Editing styles and style sets
- Managing default object properties
- Exporting and importing style sheets
- Assigning keyboard shortcuts to styles or style sets
- Finding objects that use a specific style or style set
- Breaking the link between objects and styles or style sets
- Working with color styles
- Pages and layout
- Working with pages and layout tools
- Working with tables
- Adding tables to drawings
- Selecting, moving, and navigating table components
- Inserting and deleting table rows and columns
- Resizing table cells, rows, and columns
- Formatting tables and cells
- Working with text in tables
- Converting tables to text
- Merging and splitting tables and cells
- Manipulating tables as objects
- Adding images, graphics, and backgrounds to tables
- Importing tables in a drawing
- Bitmaps
- Working with bitmaps
- Converting vector graphics to bitmaps
- Importing bitmaps
- Cropping bitmaps
- Changing the dimensions and resolution of bitmaps
- Straightening bitmaps
- Correcting perspective distortions
- Using Digimarc watermarks to identify bitmaps
- Removing dust and scratch marks from bitmaps
- Applying special effects in bitmaps
- Working with colors in bitmaps
- Using the Image Adjustment Lab
- Adjusting color and tone
- Using the Tone Curve filter
- Transforming color and tone
- Editing bitmaps with Corel PHOTO-PAINT
- Working with bitmap color modes
- Tracing bitmaps and editing traced results
- Working with RAW camera files
- Using AfterShot, CorelDRAW Edition to work with RAW files
- Working with bitmaps
- Printing
- File formats
- Importing and exporting files
- Working with 3D models
- Exporting to PDF
- Exporting documents as PDF files
- Including hyperlinks, bookmarks, and thumbnails in PDF files
- Reducing the size of PDF files
- Working with text and fonts in PDF files
- Specifying an encoding format for PDF files
- Specifying a viewing option for EPS files
- Specifying color management options for exporting PDF files
- Setting security options for PDF files
- Optimizing PDF files
- Viewing preflight summaries for PDF files
- Preparing PDF files for a print provider
- Working with office productivity applications
- Exporting to HTML
- Supported file formats
- 3D file formats
- Adobe Illustrator (AI)
- Adobe Type 1 Font (PFB)
- Windows Bitmap (BMP)
- OS/2 Bitmap (BMP)
- Computer Graphics Metafile (CGM)
- CorelDRAW (CDR)
- Corel Presentation Exchange (CMX)
- Corel PHOTO-PAINT (CPT)
- Corel Symbol Library (CSL)
- Cursor Resource (CUR)
- Microsoft Word (DOC, DOCX, or RTF)
- Microsoft Publisher (PUB)
- Corel DESIGNER (DES, DSF, DS4, or DRW)
- AutoCAD Drawing Database (DWG) and AutoCAD Drawing Interchange Format (DXF)
- Encapsulated PostScript (EPS)
- PostScript (PS or PRN)
- GIF
- HTML
- JPEG (JPG)
- JPEG 2000 (JP2)
- Kodak Photo CD Image (PCD)
- PICT (PCT)
- PaintBrush (PCX)
- Adobe Portable Document Format (PDF)
- HPGL Plotter File (PLT)
- Portable Network Graphics (PNG)
- Adobe Photoshop (PSD)
- Corel Painter (RIF)
- Scalable Vector Graphics (SVG)
- Adobe Flash (SWF)
- TARGA (TGA)
- TIFF
- TrueType Font (TTF)
- Visio (VSD)
- WordPerfect Document (WPD)
- WordPerfect Graphic (WPG)
- RAW camera file formats
- Wavelet Compressed Bitmap (WI)
- Windows Metafile Format (WMF)
- XML Localization Interchange (XLIFF)
- Additional file formats
- Recommended formats for importing graphics
- Recommended formats for exporting graphics
- General notes on importing text files
- Customizing and automating
- Setting basic preferences
- Customizing Corel DESIGNER
- Saving defaults
- Creating workspaces
- Customizing keyboard shortcuts
- Customizing menus
- Customizing toolbars
- Customizing the toolbox
- Changing the color of window borders
- Customizing the property bar
- Changing the desktop color
- Adjusting the contrast of the application workspace
- Customizing the status bar
- Customizing filters
- Customizing file associations
- Using macros to automate tasks
- Reference
Shaping objects | 193
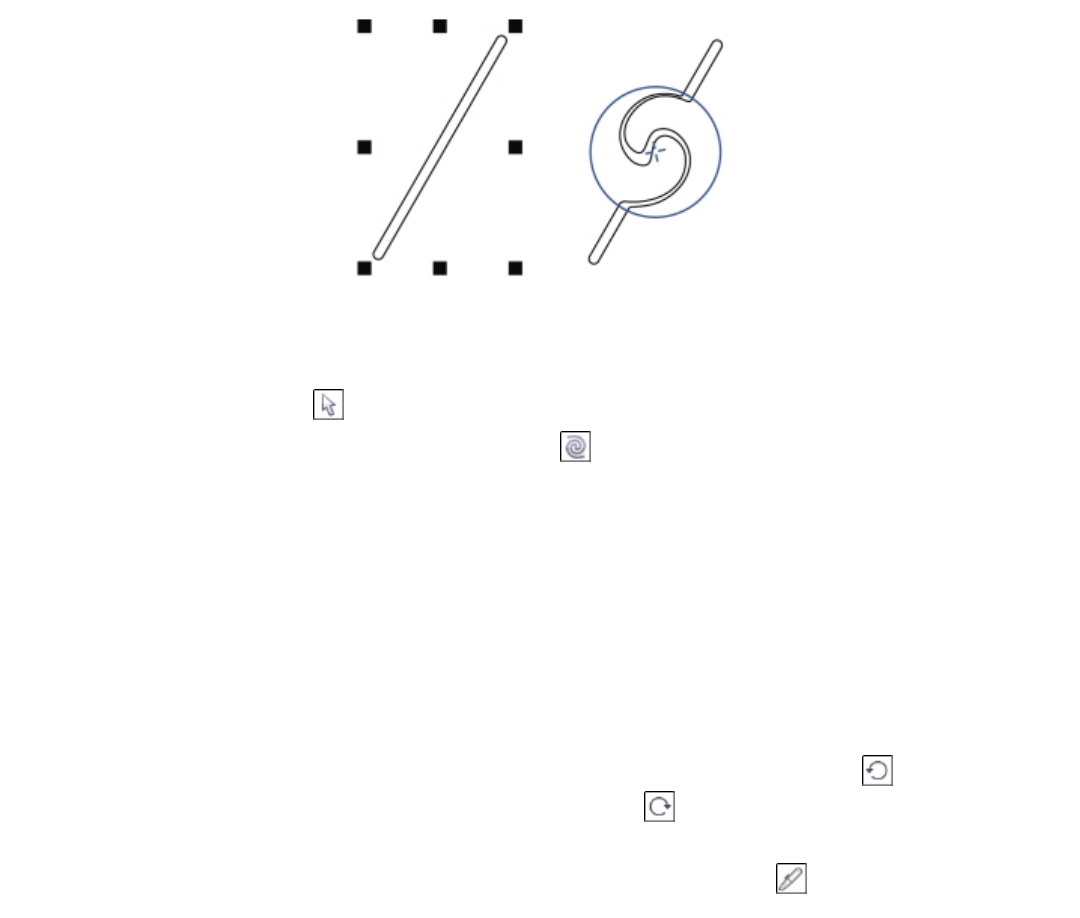
Adding a twirl effect
To add a twirl effect to an object
1
Select a curve object using Pick tool .
2
Click the Shape tools button in the toolbox, and click the Twirl tool .
3 Click the edge of the object, and hold down the mouse button until the twirl is the size you want.
To position and reshape the twirl, you can drag while holding down the mouse button.
You can also
Set the radius of the twirl effect Type a value in the Nib radius box on the property bar.
Set the rate at which the twirl effect is applied Type a value between 1 and 100 in the Rate box on the property
bar.
Set the direction of the twirl effect
Click the Counterclockwise twirl button or the Clockwise
twirl button .
Use the pressure of a digital pen to control the intensity of the twirl
effect
Click the Pen pressurebutton on the property bar.
Roughening objects
The roughening effect lets you apply a jagged or spiked edge to objects, including lines, curves, and text. You can control the size, angle,
direction, and number of the indentations, whether you use a pen tablet or a mouse.
The roughening effect is determined by the movements of the stylus (or pressure-sensitive pen), by fixed settings, or by automatically
applying perpendicular spikes to the line. Tilting the stylus toward and away from the tablet’s surface increases and decreases the size of the
spikes. If you are using a mouse, you can specify a tilt angle between 0 and 90°. You can determine the direction of the spikes by changing
the angle of rotation (or bearing) of the stylus as you apply the roughening effect to an object. When you are using a mouse, you can set
the bearing angle from 0 to 359°. You can also increase or decrease the number of spikes that are applied as you drag.
The roughening effect also responds to the pressure of the stylus on the tablet. The more pressure you apply, the more spikes are created in
the roughened area. If you are using a mouse, you can specify values to simulate the stylus pressure.
You can also change the brush nib size.