
User's Manual


7
E nglish
W indow s 2 0 0 0 / N T
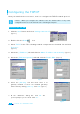
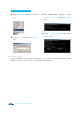
1. Click the
St art but ton and select Set tings ¼
Net work and
Dial-up Connect ions. (
Figure 1
)
2. Right- click t he
Local Area Connect ion icon at the
< Net work and Dial-up Connect ions> windows and
select
Propert ies m enu. (
Figure 2)
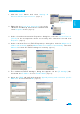
3. At t he < Local Area Connection Propert ies> dialog box, select t he
I nt ernet Protocol
( TCP/ I P)
in t he ‘Com ponents checks are used by t his connect ion’ list and click
Properties.
(
Figure 3
)
4. At the < I nt ernet Protocol ( TCP/ I P Properties) > dialog box, click the
Obt ain an I P
address
aut om atically and the Obt ain DNS server address aut om atically. Then click
Advanced t o check t he TCP/ I P sett ings for accuracy. ( Figure 4)
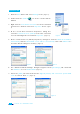
5. The < Advanced TCP/ IP Sett ings> dialog box appears. At the
[ IP Sett ings] t ab,
check t hat t he
I P Address is set t o Enable DHCP. ( Figure 5)
6. Select the
[ DNS] t ab and check t hat t he Append prim ary and connection specific
DNS suffix
is selected. Click OK. (
Figure 6
)
Figure
3
Figure
4
Figure
1
Figure
2
Figure 5
Figure
6